Purchase Invoice
| Back to Procurement Management |
Contents
Introduction
Purchase invoice window allows to register and manage supplier's invoices.
A purchase invoice is an itemized statement of the goods or services provided by a vendor or supplier. It indicates the quantity and price of each product or service provided or to be provided.
Normally the "finance" team is in charge of managing this stage of the chain, which usually comes after "Goods Receipts" booking and management.
Suppliers could send the corresponding purchase invoice/s together with the delivery note/s attached to the goods, that implies that a "Purchase Invoices" can been automatically generated
from the "Goods Receipt" window, but it could be that is not the case, therefore a purchase Invoice can also be created from scratch in the "Purchase Invoice" window.
The purchase expenses can be recognized as soon as the purchase invoice is accounted, however if an expense deferred plan is configured it is possible to deferred the expense recognition as required.
Header
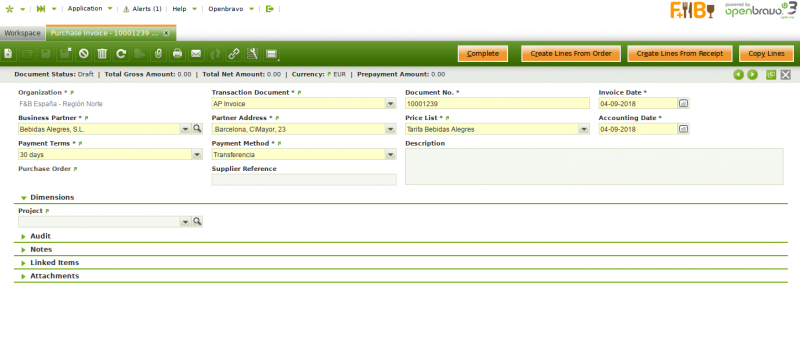
Supplier invoices can be registered, booked and managed in the header section of the purchase invoice window.
Header lists the main terms and conditions related to the purchase invoice.
In majority of the cases main (and the only) field needed to create a new purchase invoice document is the Business Partner field. All other fields will be pre-filled automatically based on the selected Business Partner, logged in User preferences and other system default parameters.
Some other fields to note are:
- Transaction document defaulted as "AP Invoice" or purchase invoice document type which can be manually changed to either "AP Credit Memo" or "Reversed Purchase Invoice".
- "AP Credit Memo" and "Reversed Purchase Invoice" document types can be considered credit purchase invoices, the difference between them is that:
- "AP Credit Memo" type must contain either an "Invoiced Quantity" > 0 or "line Net Amounts" >0.
Above implies that invoices set as "Credit Memo" should not be related to "Orders" or "Shipments". - "Reversed Purchase Invoice" type must contain either an "Invoiced Quantity" <0 or "line Net Amounts" < 0. These are the invoices types that can be related to return "Orders" or "Shipments".
- "AP Credit Memo" type must contain either an "Invoiced Quantity" > 0 or "line Net Amounts" >0.
- "AP Credit Memo" and "Reversed Purchase Invoice" document types can be considered credit purchase invoices, the difference between them is that:
| Starting from PR18Q4 The "Create Lines From" button has been replaced by two different buttons: “Create Lines From Order” and “Create Lines From Receipt” |
- Document No. You could manually fill in the supplier's invoice number in this field, if the document sequence number associated to the transaction document "AP Invoice" is setup to allow you to do that; otherwise it will be automatically provided by the system as an "Internal" purchase invoice number.
- Invoice Date: the date the invoice is registered. It is used to calculate when the payment of the invoice is due. Defaulted to the current date can always be changed.
- Accounting Date: the date to be used in the posting record of the Purchase Invoice to the general ledger. Defaulted to the Invoice Date field can always be changed
- Payment Terms: indicates how an invoice should be paid. Defaulted according to the Vendor/Creditor tab of the Business Partner window.
- Payment Method: defines when a purchase invoice needs to be paid. Defaulted according to the Vendor/Creditor tab of the Business Partner window.
- Supplier Reference: this is a not-mandatory field which can be used to enter the supplier invoice number.
There are 3 ways of entering lines into the purchase invoice, two of them from the invoice header and the last one from the Lines tab:
- Selecting products from pending to be invoiced orders or receipts using the Create Lines From Order and Create Lines From Receipt buttons.
- Copying all products from the chosen invoice selected in the history of all invoices for different business partners using the Copy Lines button.
- Manually, line by line in the Lines tab. This option is used if the underlying document (Purchase Order or Goods Receipt) does not exist in the system prior invoicing takes place.
The Complete button finishes the creation of the invoice document with the fulfillment of the Payment Plan tab and the Payment Monitor section in the Header. If there are non-stockable BOM products in the lines and they have not been exploded, the Complete button will explode them automatically.
Once completed a purchase invoice can be:
- posted to the ledger by using the button Post
- voided by using the button Reactivate
- and paid by using the button Add Payment.
Lines
Once the purchase invoice header has been properly filled in and saved purchase invoice lines can be registered in this tab.
Lines list each product to be purchased and its characteristics.
The fields to note are:
- Financial Invoice Line is selected when the invoice line is not a product but an account do not set up as a product but as a G/L Item, or an asset do not set up as a product.
When selected, the product field disappears from the screen and an account field appears related to the purchase invoice line. - Attribute Set Value: field is displayed if the product in the line has attributes (color, size, serial number or several of them together etc).
- Purchase Order Line and Goods Receipt Line: references to the purchase order and goods receipt line that is being invoiced.
As already mentioned purchase expenses can be deferred therefore they are not recognized at the purchase accounting date but within a given number of accounting periods.
When a purchase invoice line is created, it is possible to define at line level, whether the line is going to cause the expense to be deferred. The relevant fields are:
- Deferred Expense: When this flag is checked, the Expense Plan field group becomes visible, allowing users to configure the next three fields.
- Expense Plan Type: this field specifies the frequency of the expense distribution which currently is "monthly".
- Period Number: this field specifies the duration of a expense plan.
For instance if a company purchase a business insurance for the duration of the year, the period number to enter would be 12 as the company would like to distribute that expense over 12 months. - Starting Period: the first open period in which the expense is going to be recognized.
- These fields can be defaulted if configured for the product.
- If an expense plan is configured that implies a specific purchase invoice accounting.
Explode button is shown when selecting a line with a non-stockable BOM product and the product is not already exploded. When exploding a product, the bill of materials components the selected product consists of are shown in the invoice. Once you have exploded it, you cannot comprime it. You should delete all the lines (first bill of materials components and then the BOM product), and insert again the non-stockable BOM product.
Match LC Cost button is shown when purchase order line contains either an "account" or a "product" setup as landed cost type.
This process button allows to match both the "estimated" landed cost booked in the landed cost window, and the one being invoiced in the invoice line. Both ones needs to be of the very same landed cost type.
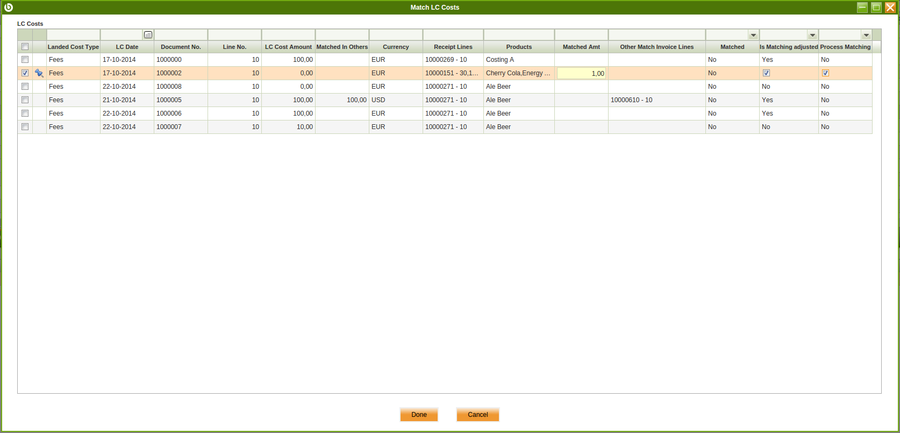
Once selected "Match LC Cost" button opens "Match LC Cost" pick and edit window.
Only processed Landed Cost documents will be shown in this Window. It allows to pick the corresponding landed cost, enter an amount to match in the field "Matched Amt", and then select "Process Matching" check-box.
Note that if the "Process Matching" check-box is not selected here, landed cost matching will have to be processed in the landed cost window by using Process Matching button. (See scenario 3).
It is important to remark that the "estimated" landed cost booked in the landed cost window can be of the very same amount than the one being invoiced or not.
"Is matching adjusted" Check-box allows to create an additional landed cost adjustment if checked, in order to add/remove that difference from the product cost.
In Summary:
- if "estimated" landed cost(s) amounts are equal to "invoiced" landed cost(s) amounts, nothing else happens after processing the matching but matching post to the ledger.
- if "estimated" landed cost(s) amounts are not equal to the the "invoiced" landed cost(s) amounts, an additional "landed cost" adjustment is created if the check-box "Is Matching Adjusted" is set to "Yes", therefore product cost is once again adjusted to the correct "invoiced" landed cost amount.
- Besides that matching post will be different depending on whether "Is Matching Adjusted" check is set to "Yes" or "No". For additional information, please review Post Matching wiki article.
Line Tax
Line tax information is automatically populated for each purchase invoice line upon completion of the invoice.
Line tax tab informs about each purchase invoice line:
- applied tax rate
- taxable amount
- and calculated tax amount
It is not possible to either manually create a new line or modify existing ones.
Tax
Summarized purchase invoice tax related information is shown in this tab.
Therefore, there will be as many records in this tab as tax rates used. Each record will show summarized information about:
- the total taxable amount for that tax rate
- and the calculated tax amount for each tax rate
It is possible to add new line/s for a given tax (tax rate) selected, by entering:
- either the tax amount, therefore Openbravo calculates the correct taxable amount
- or the taxable amount, therefore Openbravo calculates the correct tax amount
Basic Discounts
This tab lists information about the discounts automatically applied based on the supplier configuration and / or manually entered for the purchase invoice.
Payment Plan
The payment plan tab lists the scheduled payments expected against the invoice.
The payment plan of a non paid invoice can be changed:
- the payment "expected date" can be directly changed if required in this tab
- the payment "expected date", the "payment method" and the "outstanding amount to be paid" among other can be changed if required by using the Editable Payment Plan advanced feature.
For more details please review the Invoice's Payment Plan article.
Payment Details
This tab displays the details of the payments made against the invoice.
Reversed Invoices
This tabs allows the user to select the invoices (if any) being reversed by the invoice being created. When the user voids an existing invoice the reverse invoice is automatically created by Openbravo and linked to the original invoice being reversed. In case of creating a Reverse Purchase Invoice which partially voids an existing invoice/s, the user must manually select the invoice/s being reversed in this tab.
As already described purchase invoices can be reversed without any problem, if required.
If a purchase invoice is totally voided:
- Openbravo informs about the Reversed Invoice number automatically created
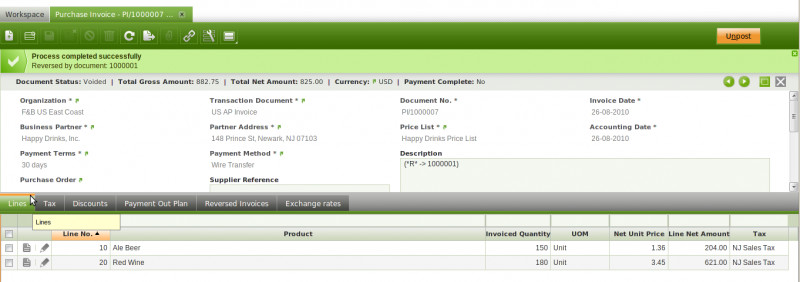
- the original invoice voided is listed in the "Reversed Invoices" tab of the "Reversed Purchase Invoice"
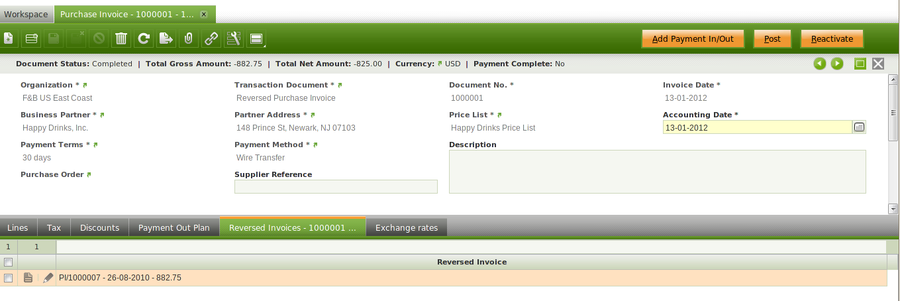
If a purchase invoice/s require to be partially voided:
- you should manually add it/them in the "Reversed Invoices" tab of the "Reversed Purchase Invoice" documents used to void an invoice/s.
Exchange rates
The exchange rate tab allows to enter an exchange rate between the organization's general ledger currency and the currency of the supplier's invoice to be used while posting the invoice to the ledger.
Openbravo allows to manage different currencies within an organization or business unit.
Nowadays, it is very common for the organizations located in a country to make business with third parties located abroad, and even more, it could also happen that an organization needs to post the transactions to general ledgers configured in different currencies.
To learn more visit General Ledger Configuration.
Above described business scenario, implies the need of managing exchange rates between the organization's general ledger currency and the supplier's invoice currency to be used while posting the supplier's invoice to the ledger/s.
This tab allows you to enter:
- either an exchange rate between the organization's general ledger/s currency and the supplier's invoice currency
- or the total foreign invoice amount/s, therefore Openbravo can calculate the corresponding exchange rate/s
Additionally, Openbravo has a "central" repository of exchange rates which are used in case there is no an exchange rate defined at document level.
Payment
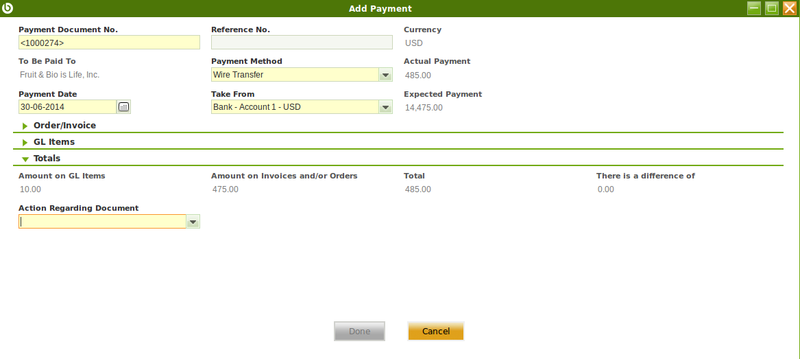
Payment/s can be made against a purchase invoice by using the Add Payment button which opens the Add Payment window.
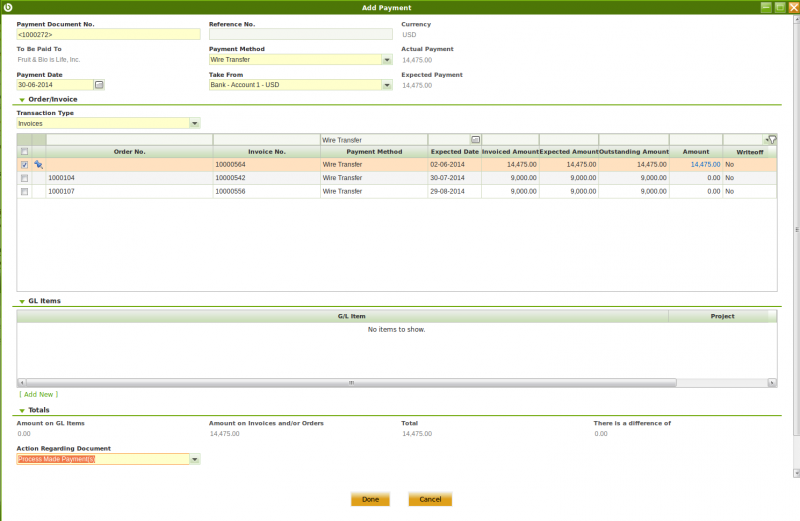
As shown in the image above Openbravo shows a new window named "Add Payment". This window is split into four sections:
- Header section shows information such as the "Payment Document Nº", the "Payment Date", the "Payment Method" or the "Currency".
- Order/Invoice section allows to select/unselect the orders or invoices to be paid
- G/L items section allows to add any type of expense related to the payment being entered.
- and Totals section summarizes the "total amount paid on GL items", the "total amount paid on Order/Invoices" payments and the difference between the "Actual Payment" and the "Expected Payment".
This section also includes the actions to process the payment.
Adding Order/Invoices
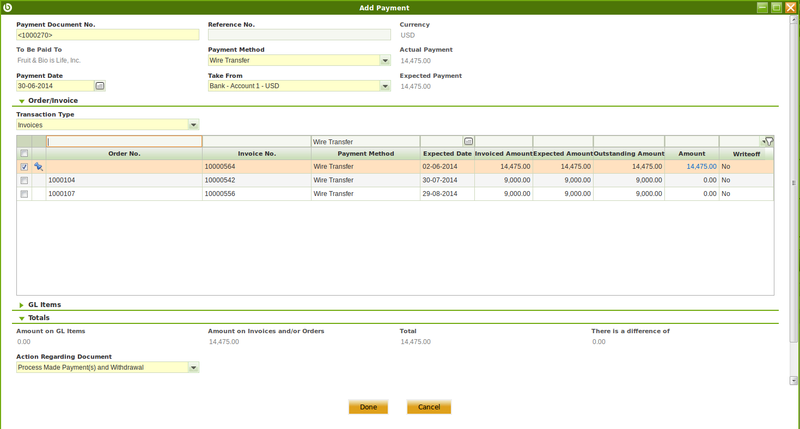
If the "Add Payment" window is opened from a "Purchase Invoice", all invoice scheduled payments are selected by default if there are more that one, and the "Expected Payment" amount is set as equal as the "Invoice Amount", and the "Transaction Type" field is set to "Invoices". See image below:
The reason for the above is that Openbravo understands that the invoice is going to be fully paid, but obviously that could not be the case. Therefore:
- It is always possible to uncheck any of the scheduled payments selected by default or change the payment amount for a particular scheduled payment, if an invoice partial payment needs to be registered.
Both cases the "Expected Payment" field changes accordingly. - It is also possible to select additional purchase invoices and/or orders to pay to the same vendor by changing the value selected in the field "Transation Type".
The options available are: "Orders" , "Invoices" and "Orders and Invoices". - It is also possible to select additional orders and/or invoices to pay even having an alternative payment method by just removing the payment method shown in the filtering section.
- And finally, it is also possible to filter orders and/or invoices within a given expected date from/to range by using "Expected Date" filtering capabilities.
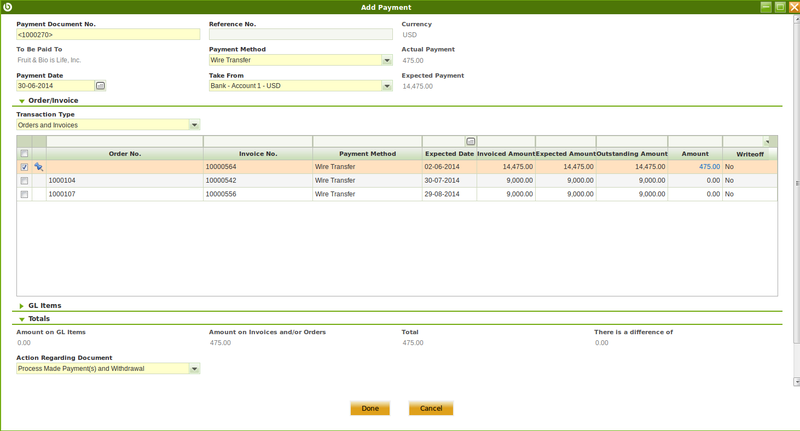
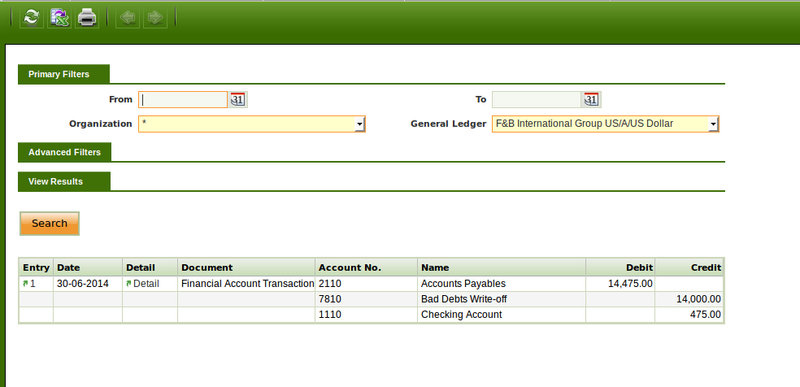
As shown in the image above, in the case actual payment amount is less than the grand total, the difference or outstanding amount left to be paid is shown in the grid line and this amount is consider as an underpayment. On the other hand, that difference can be "Written-off" by just checking the field Writeoff next to the field "Amount". If that is the case:
- the purchase invoice is set as fully paid
- the invoice posting to the ledger settles the total vendor liability amount
- while the payment posting to the ledger uses besides the Write-off Revenue account to post the amount written-off.
Adding G/L items
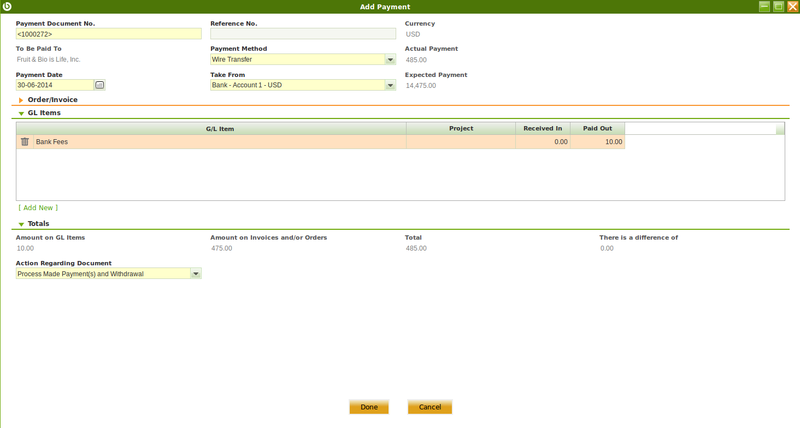
GL Items section allows to enter any type of expense related to the payment but do not included in the invoice, by clicking on [Add New] .
First thing to do is to select the G/L item for the expense and then enter the expense amount in the field "Paid Out" as shown in the image below:
Note that accounting dimensions such as "Project" can be shown depending on the Accounting Dimensions defined for the Client.
Once done,
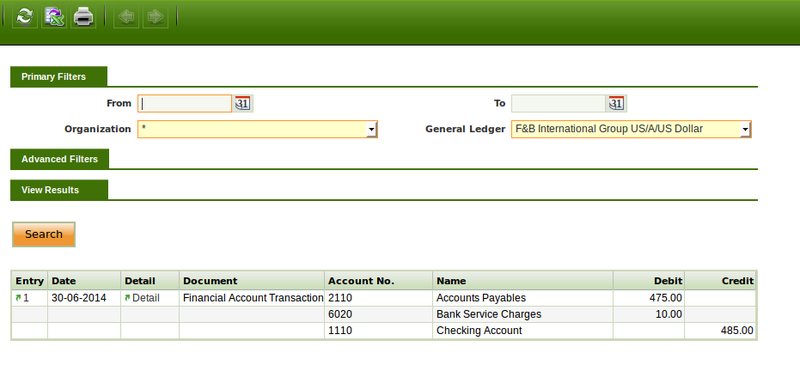
- the invoice posting to the ledger settles the total vendor liability amount
- while the payment posting to the ledger uses besides the G/L item account to post the paid expense amount.
Reviewing the totals and processing the payment
As already mentioned, "Totals" section allows to review:
- the total amount to be paid on G/L items
- the total amount to be paid on Invoices and/or Orders
- the grand total
- and the diference between the "Actual Payment" and the "Expected Payment".
And also, "Totals" section allows to process a payment by selecting an option in the field "Action Regarding Document". The options available are:
- Process Made Payment(s): this option just process the Payment so a new payment is created in the Payment Out window.
- Process Made Payment(s) and Withdrawal: this option besides processing the payment creates a withdrawal transaction in the Financial Account.
The options above depends on the setup of the payment method:
- If Automatic Withdrawal option had already been selected within the payment method for Payment, only the option Process Made Payment(s) and Withdrawal is shown. However
- If the Automatic Withdrawal option had not been selected, both actions are offered giving the user an option to choose whether they want the Withdrawal to be executed as well or not.
Finally any of these actions updates Payment Monitor section of the Invoice Header. The Paid amount is also reflected in the Payment Plan tab of the Purchase Invoice (and the Purchase Order if it exists). Details of the payment can be found in the Payment Details tab.
Credit Payments
Whenever there is available credit for a vendor a new window is automatically open upon completion of a new vendor's purchase invoice in order to allow the user to either select the credit available to pay that new invoice or not.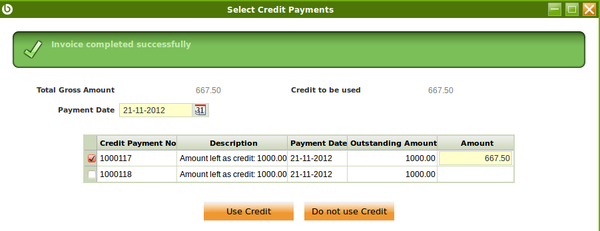
- If the available credit is used:
- the payment status of the invoice changes to Payment Complete = Yes, whenever the credit amount used fulfill total invoice amount.
- a literal such as "Invoice paid using credit:Payment Nº (Credit Payment)" is automatically populated in the description field of the invoice
- a new payment is automatically created in the Payment Out window. This payment clearly states the invoice paid in the "Description" field and the credit payment used is shown in the Used Credit Source tab of the payment out.
- If the available credit is not used
- nothing happens, the new invoice is still not paid and the available credit amount remains the same.
Moreover it is also possible to use the available credit generated for that particular vendor later on while "Adding a Payment" for that vendor.
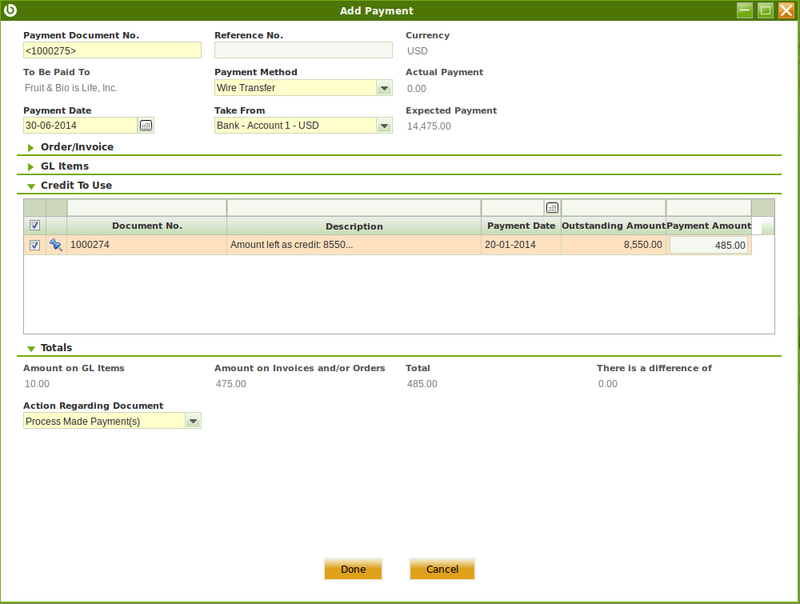
If that is the case a new section is shown in the "Add Payment" window, that is "Credit to Use" section. See image below:
"Credit to Use" section shows all credit payments created for a given vendor (if more than one), therefore it is possible to select one or more, and even change the credit amount to be used for the payment, in the field "Payment Amount".
Once the payment is processed, a new payment is created in the Payment Out window. That payment states at the very top the "Used Credit" amount.
Payments in multiple currencies
Openbravo allows to make payments in a different currency than the financial account currency.
For getting that working the payment method assigned to the financial account used to make the payment needs to be configured to allow so, that implies to select the check-box "Make Payments in Multiple Currencies".
Let's take for instance an organization such as "F&B US Inc".
This organization is located in USA, therefore it is likely that the organization's general ledger currency as well as the financial account currency is set as USD.
F&B US Inc makes business with a supplier located abroad. This supplier issues its invoices in EUR currency (therefore a Price List in EUR will then be needed) and requires to be paid in EUR currency. This means that:
- F&B US Inc organization needs to record the supplier's invoice in EUR same as the payment to the supplier.
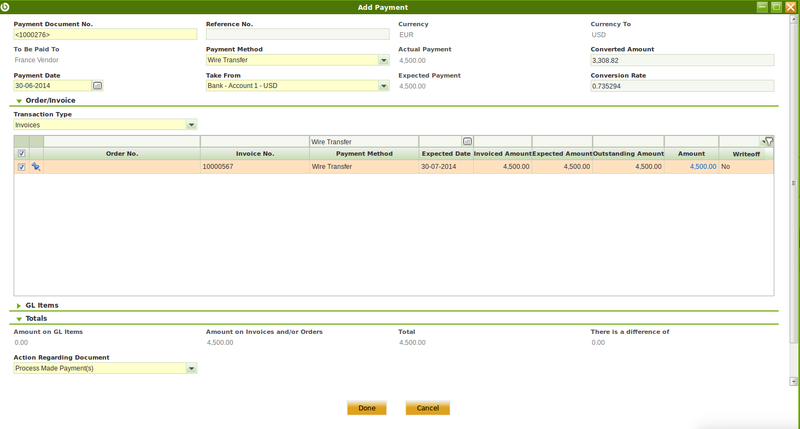
- If the supplier's payment is registered in the "Add Payment" window shown from the "Purchase Invoice" , Openbravo allows to enter the conversion rate between EUR to USD.
Once the payment is processed, a new payment out will be created in the Payment Out window.
This payment will clearly states "Paid" amount in EUR currency as well as "Paid" amount in USD currency, together with the exchange rate used.
Accounting
Accounting information related to the purchase invoice
For more details please review the accounting article.
A purchase invoice can be posted to the ledger when required at a given "Accounting Date" by using the process button "Post".
Purchase invoice posting creates the following accounting entries:
| Account | Debit | Credit | Comments |
| Product Expense | Line Net Amount | One per invoice line | |
| Tax Credit | Tax Amount | One per tax line. | |
| Discount Product Expense | Discount amount | One per invoice line (if discount exists) | |
| Vendor Liability | Total Gross Amount | One per invoice |
Same way, a Purchase Invoice including a purchase invoice line with an expense plan configured creates the following accounting entries.
For instance a company purchasing a business insurance for the duration of a year would want to distribute that expense over 12 months.
Posting record date: Accounting Date:
| Account | Debit | Credit |
| Product Deferred Expense | Line Net Amount | |
| Tax Credit | Tax Amount | |
| Vendor Liability | Total Gross Amount |
Posting record date: Accounting Date + 1 month:
| Account | Debit | Credit |
| Product Expense | Line Net Amount/12 | |
| Product Deferred Expense | Line Net Amount/12 |
Posting record date: Accounting Date + 2 months:
| Account | Debit | Credit |
| Product Expense | Line Net Amount/12 | |
| Product Deferred Expense | Line Net Amount/12 |
.....
Posting record date: Accounting Date + 12 months:
| Account | Debit | Credit |
| Product Expense | Line Net Amount/12 | |
| Product Deferred Expense | Line Net Amount/12 |
Voiding
It is possible to totally void a purchase invoice, by using the header button "Reactivate" and then selecting the action "Void".
This action creates a new document that reverse the invoice.
Void action allows to specify a "Void Date" and a "Void Accounting Date" for the new document that reverse the invoice.
Both "date" fields above take the current date as default date and validate that the dates entered are not prior to the invoice date and the invoice
Full list of Purchase Invoice window fields and their descriptions is available in the Purchase Invoice Screen Reference.
| Back to Procurement Management |
