Difference between revisions of "Create Invoice Lines From refactor"
(Created page with "= Introduction = The purpose of this document is to explain the functional and technical design followed in the refactoring of the "Create Lines From" process on invoice wind...") |
(→Added more information of the copied lines and filtering support.) |
||
| Line 46: | Line 46: | ||
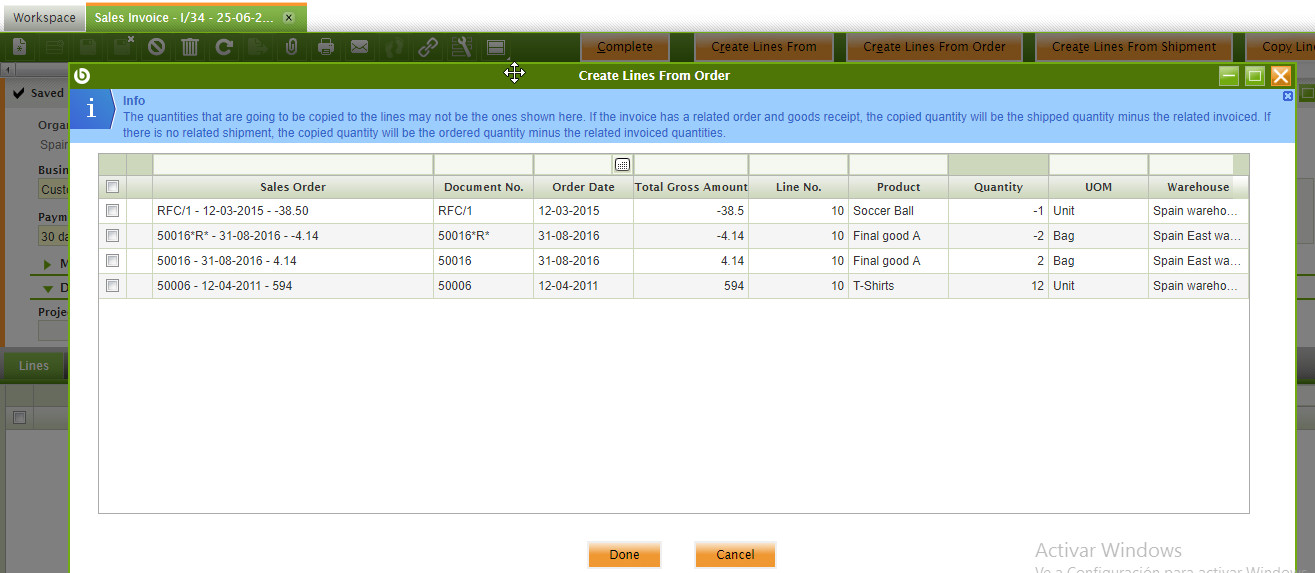
[[File:CreateLinesFromOrderFinal.jpg | Create Invoice Lines From Order P&E]] | [[File:CreateLinesFromOrderFinal.jpg | Create Invoice Lines From Order P&E]] | ||
| + | <ins></ins> | ||
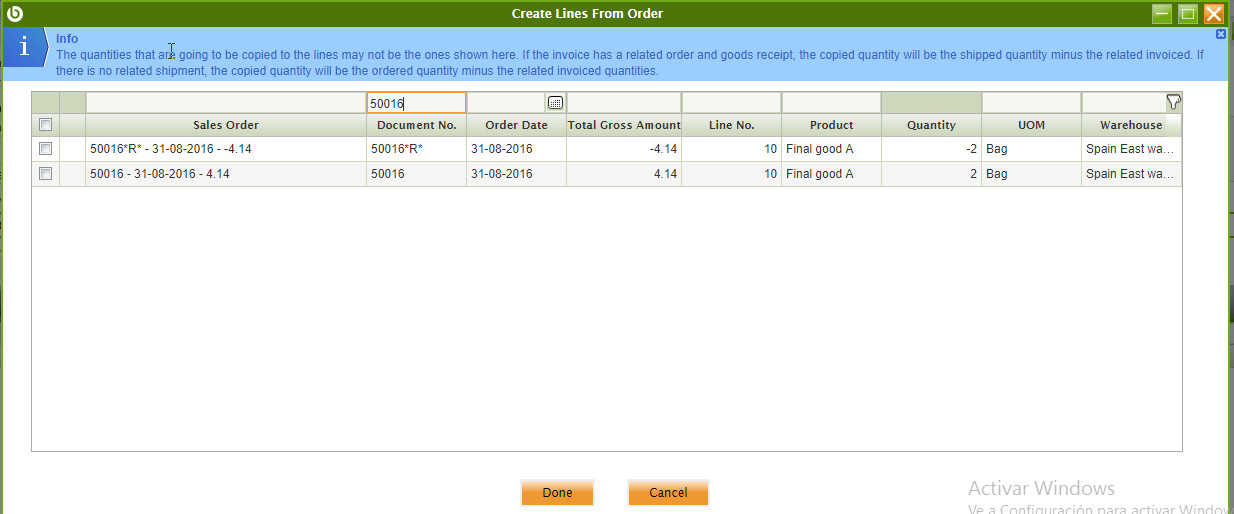
[[File:FilteringInCreateLinesFromOrder.jpg | Filtering in Create Invoice Lines From Order P&E]] | [[File:FilteringInCreateLinesFromOrder.jpg | Filtering in Create Invoice Lines From Order P&E]] | ||
Revision as of 21:27, 20 November 2021
Contents
Introduction
The purpose of this document is to explain the functional and technical design followed in the refactoring of the "Create Lines From" process on invoice windows, to improve the performance and the user experience. This refactor has been included from the 3.0PR18Q3 product version in advance.
The "Create Lines From" process had some performance problems in environments with high volumes of information, as well as some functional limitations such as not being able to select order/shipment/receipts lines of different orders/shipments/receipts at a time and having to first selecting the document and then the lines.
To cover these deficiencies and provide a more intuitive and functional interaction, this process was migrated to a new processes called “Create Invoice Lines From Orders” and “Create Invoice Lines From Shipment/Receipt”. In this document, we will explain the main functional changes that were needed to fulfill these objectives and some technical topics to a better understanding of it.
This refactor cover some of these limitations explained on the design defect and includes other functionalities that we going to explain with more detail in this document.
Design changes.
The User Interface was affected by some changes. We can say the most important are:
Migration to a Pick and Edit window
The old process "Create Lines From" was defined as a manual process and does not make use of the benefits of a Process Definition and Pick and Edit windows. The first thing done was to migrate the current process logic to two different new Process Definition, using the Pick and Edit (PE) pattern on Sales and Purchase Invoice windows, and improves interaction with users.
Allow to select more than one line at a time
With the old process only was possible to select one order/shipment/receipt at a time and the select it lines, which increases the amount of user interactions to add lines of several documents. This time the new processes allows to select lines of different documents at once.
Separated the logic of creation from Orders and creation from Shipment/Receipts
With the old process, no matter the document type of lines the user wants to create from, the Create Lines From window load all the order and the Shipment/Receipts lines that can be invoiced. It implies an extra load if the user just want to create lines from a particular document type.
The Create Lines From button has been replaced by two different buttons in each window: Sales Invoice: “Create Lines From Order”, “Create Lines From Shipment” Purchase Invoice: “Create Lines From Order”, “Create Lines From Receipt”
It is splitted in two buttons in order to get a better user experience without mixing together orders and shipments/receipts and get a better performance experience as it is only launched a query (order or shipment/receipt) at a time.
The “Create Lines From Order” button will just show Sales/Purchase order lines (depending on the window from which it was launched) that are ready to be invoiced. It means there is no need to have a separate combo (as we have right now) to select first the order. Different lines from different orders can be selected at the same time [new behavior]. Only orders from the invoice’s business partner will be shown (as in the old process)
The “Create From Shipment”/“Create From Receipt” buttons will just show Goods Shipment/Receipt lines (depending on the window from which it was launched) that are ready to be invoiced. It means there is no need to have a separate combo (as in the old process) to select first the shipment/receipt. Different lines from different shipments/receipt can be selected at the same time [new behavior]. Only shipment/receipts from the invoice’s business partner will be shown (as right now)
Added more information of the copied lines and filtering support.
In the new P&Es were added other fields that give more information to the user and the possibility of filtering the selection. Example of new fields are:
- Document No.
- Order/Movement Date.
- Total Gross Amount.
- Warehouse (and Storage Bin in case of Shipment/Receipt).
- Order Quantity: Hidden by default.
- Scheduled Delivery Date (In Create Lines From Order process): Hidden by default.
Technical Design
The current refactor has as most important changes:
- The grids for P&E are based on a HQL tables with HQL insertion points.
- The existing SQL queries to get first the order/inout header and then the lines have been merged and optimized in just one HQL query (one for order lines, one for inout lines). Ensuring are showed the same records before/after the refactor and times to get the information hace been improved.
- The java code in charge of the business logic has been refactorized following the clean code conventions.
- The business logic includes hooks to be extended by external modules.
- The records in the P&E are ordered by default by document no descendental and line no ascendingly.
Rules followed when processing
The process copies information from the copied lines and generates its own information according the document header and environment settings. In this section, we going to do a summary of the most remarkable topics to take into account.
The lines are copied in the same order they were selected in the P&Es. The process adds as many lines as lines have been selected. In the case it is copying an order line partial or completely delivered, the process will create as many lines as shipment/receipts the order line has related to. The new invoice lines will have a reference to the order and/or the shipment/receipt lines they are related to and from which they were created.
Limit the records count by a date range
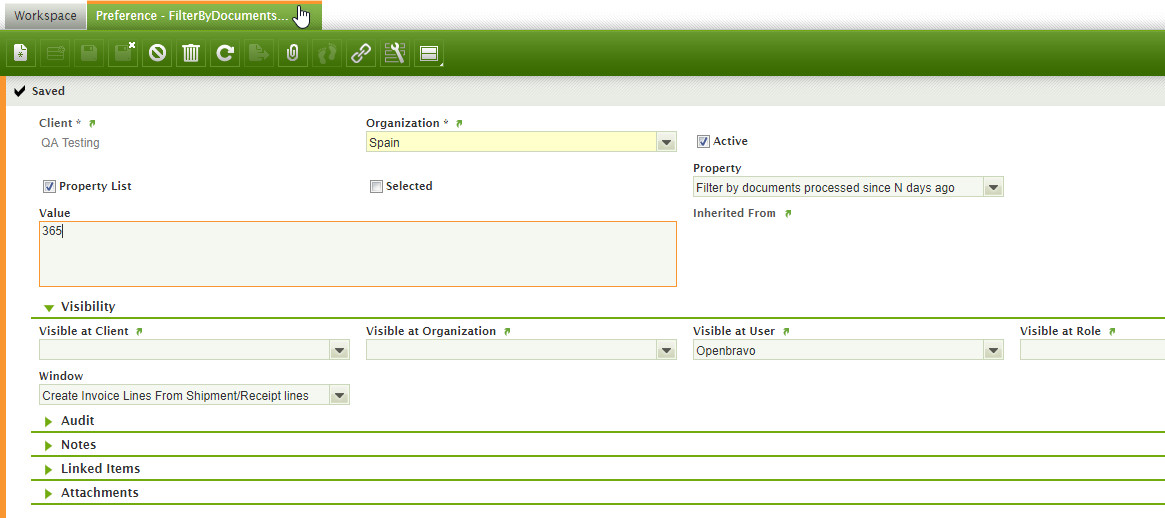
An important change introduced in this refactor is the possibility to filter the records when the P&Es are opened by a date range that can be configurable by a new preference. This preference is used by the process to limit transactions starting from the current date to the defined days ago. If the preference is not defined then queries retrieve all records created since one year ago (365 days), else it will be filtered by the count of days defined as preference value.
Important to remark is that:
- You need to select the "Filter by documents processed since N days ago" property.
- You must define its value as a valid integer, because the process will use the default range if is wrongly defined.
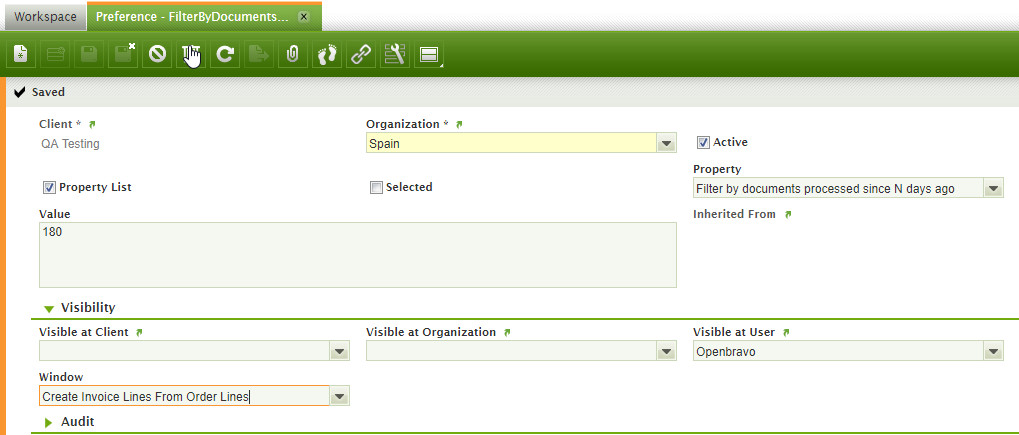
You can define this preference in the same way than any other Client/Organization preference. Taking into account the transactions volume, periods and how frequently there are order/shipment/receipt pending to be invoiced is possible to create more than one preference with different settings. For example, if the organization have not to many invoiceable orders in six months, then administrator can consider limit the count of days to 180 instead of 365 (one year) for the Create Invoice Lines From Order window:
This setting included in the project improves the performance because avoid iterate for a high volume of information that probably will be unneded.
Technical Changes
This refactor generates several changes into the database and core java classes. In this section, we are going to do a brief explanation of the most important changes.
Java classes changes
Several changes were done in the java classes to implements the design requirements. In this section, we will explain the created artifacts and how to extend the core’s logic by hooks.
Classes were created to separate the action handler and the processing logic, to make more easiest the understanding of the code and make the processing independent of the flows where it is used, and making possible to be used in programmatic codes like automated tests.
CreateInvoiceLinesFromHandler class.
It was created as an abstract action handler class, that it is implemented by the new two processes (Create Lines From Order and Create Lines From Shipment/Receipt), but also brings support to any future development that would like to create invoice lines from other document types.
<source lang="java"> /**
* Abstract class to be implemented by any process that creates invoice lines from any Openbravo
* BaseOBObject
*
* @param <T>
*          Invoice lines will be created from an object whose class extends from the BaseOBObject
*/
abstract class CreateInvoiceLinesFromHandler<T extends BaseOBObject> extends BaseProcessActionHandler {
private static final Logger log = LoggerFactory.getLogger(CreateInvoiceLinesFromHandler.class);
protected abstract Class<T> getFromClass();
 @Override
 protected JSONObject doExecute(Map<String, Object> parameters, String content) {
   try {
     JSONObject jsonRequest = new JSONObject(content);
     JSONArray selectedLines = CreateLinesFromUtil.getSelectedLines(jsonRequest);
     Invoice currentInvoice = CreateLinesFromUtil.getCurrentInvoice(jsonRequest);
throwExceptionIfNoLineSelected(selectedLines);
     // CreateLinesFromProcess is instantiated using Weld so it can use Dependency Injection
     CreateInvoiceLinesFromProcess createLinesFromProcess = WeldUtils
         .getInstanceFromStaticBeanManager(CreateInvoiceLinesFromProcess.class);
     createLinesFromProcess.createInvoiceLinesFromDocumentLines(selectedLines, currentInvoice,
         getFromClass());
     jsonRequest.put(CreateLinesFromUtil.MESSAGE, CreateLinesFromUtil.getSuccessMessage());
     return jsonRequest;
   } catch (Exception e) {
     log.error("Error in CreateInvoiceLinesFrom Action Handler", e);
     return showExceptionInViewAndRetry(e);
   }
 }
</source>
It is important to remarks that this solution is using Weld and can be instantiated the CreateInvoiceLinesFromProcess class using dependency injection. In the next topics, we going to explain it and the java classes structure with more details.
CreateInvoiceLinesFromInOutLines and CreateInvoiceLinesFromOrderLines classes
We have two classes managing the creation from the Order Lines and from the Shipment/Receipts lines. They are CreateInvoiceLinesFromOrder and CreateInviceLinesFromInOut classes. As the logic executed by both process is generic and share common logic, all the logic s in the abstract class CreateInvoiceLinesFromHandler, and only is needed to specify the class of the objects that process will copy.
<source lang="java"> /**
* Implementation for Create Invoice Lines From InOut Lines
*/
public class CreateInvoiceLinesFromInOutLines extends CreateInvoiceLinesFromHandler<ShipmentInOutLine> {
 @Override
 protected Class<ShipmentInOutLine> getFromClass() {
   return ShipmentInOutLine.class;
 }
} </source>
<source lang="java"> /**
* Implementation for Create Invoice Lines From Order Lines
*/
public class CreateInvoiceLinesFromOrderLines extends CreateInvoiceLinesFromHandler<OrderLine> {
 @Override
 protected Class<OrderLine> getFromClass() {
   return OrderLine.class;
 }
} </source>
CreateInvoiceLinesFromProcess class
This class execute the processing of the selected lines. It provide support to extend the functionality by hooks, in fact almost all the logic is implemented as part of a hook.
As reference of how to implements a specific functionality in a hook, can be found as part of the classes included on Core as part of this project. For example, the process follows the following steps:
- Update Invoice and Invoice Line related information (implemented on UpdateInvoiceLineInformation.class): This hook Updates the Information of the new Invoice Line that is related with the Invoice Header and the copied order line. It is in charge of:
- Link the invoice line to the order and/or shipment/receipt line from it is created.
- Set the client and description from the invoice header to the invoice line.
- Set the accounts dimensions to the new line.
- Update BOM Parent if exists.
- Update the invoice prepayment when copying from prepayment orders.
- Update the order reference to the invoice header.
- Copy product and attributes (implemented on UpdateProductAndAttributes.class): This hook copies the product of the selected line in the P&E and it attributes to the new invoice line.
- Calculate amounts and UOM's. (implemented on UpdateQuantitiesAndUOMs.class): This hook manage the amounts and gives support to alternatives unit of measures (AUM).
- Calculate Prices based on price list (implemented on UpdatePricesAndAmounts.class): Updates prices and amounts. If the copied line is related with an order line then copy exactly the same prices from the original line. If the copied line is unrelated with an order line then if the product has a product price in the invoice price list then all prices and amounts will be recalculated using currency precisions and taking into account if the price list includes taxes or not.
- Calculate Acc and Def Plan from Product (implemented on UpdateAccAndDefPlanFromProduct.class): This hook updates the accounts and definition plans from product. It includes the plan type, period number, starting period and if the invoice line will be marked as deferred or not.
- Recalculate Taxes (implemented on UpdateTax.class): This hook is in cahrge of search the correct line tax, taxable amount and tax amount of the new invoice line.
How to extend Core’s functionality with hooks.
If you want to extend the core implementation included on this refactor with your own logic, you must take into account the following.
Add the following annotations to the class: <source lang="java"> @Dependent @Qualifier(CreateLinesFromProcessHook.CREATE_LINES_FROM_PROCESS_HOOK_QUALIFIER) </source>
The class must implement the CreateLinesFromProcessHook abstract class: <source lang="java"> class NewHook implements CreateLinesFromProcessHook{ </source>
Taking as example the UpdateTax hook implementation: <source lang="java"> @Dependent @Qualifier(CreateLinesFromProcessHook.CREATE_LINES_FROM_PROCESS_HOOK_QUALIFIER) class UpdateTax extends CreateLinesFromProcessHook {
private static final Logger log = LoggerFactory.getLogger(UpdateTax.class);
 @Override
 public int getOrder() {
   return -10;
 }
 /**
  * Update order line tax, taxable amount and tax amount. Throws an exception if no taxes are
  * found.
  */
 @Override
 public void exec() {
   updateTaxRate();
   updateTaxAmount();
   updateTaxableAmount();
 }
</source>
When a new hook is implemented you need to override the following two methods:
- getOrder(): It will returns the order when the concrete hook will be executed. A positive value will execute the hook after the core's logic.
- exec(): Executes the hook logic on the Create Lines From process.
Example of a hook creation.
According to the explained above, if we want to implement a hook, for instance that updates the new invoice line description with the “It is a test” string, and it is needed to be executed after the core actions and between other customized hooks (some with defined execution order less and greater than 10), a possible implementation of it could be:
<source lang="java"> @Dependent @Qualifier(CreateLinesFromProcessHook.CREATE_LINES_FROM_PROCESS_HOOK_QUALIFIER) public class TestHook implements CreateLinesFromProcessHook{
   @Override
   public int getOrder() {
     return 10;
   }

   @Override
   public void exec() {
     getInvoiceLine().setDescription("It is a test");
   }
 }
</source>
In this code it is enough to fulfill the requirements of our example, but it can be as complex as the logic you want to execute.
Database changes
Important changes were done in the database to implement the design requirements. In this section, we are going to explain the created artifacts and how to easily extend the information in the P&Es with customized fields.
New HQL tables used in P&Es
Were created two new HQL tables in the AD to get the P&E records:
- C_OrderLine_PE_HQL: Used in the Create Invoice Lines From Order Lines window. It gets all the sales/purchase order lines of those orders that can be invoiced.
- M_InOut_PE_HQL: Used in the Create Invoice Lines From Shipment/Receipt Lines window. It gets all the shipment/receipt lines of those Shipment/receipts that can be invoiced
As these tables are used in Sales windows as well as Purchase windows, they are defined in a generic way, and they are transformed according the window they are executed (Sales Invoice or Purchase Invoice). Taking the C_OrderLine_PE_HQL HQL Query as example, we are going to explain how it works and how user can extend this to add more fields to the P&E. We going to start viewing the HQL Query definition:
<source lang="sql"> SELECT
 e.id,
 @orderedQuantity@ as orderedQuantity,
 (select uom.name from UOM uom where uom.id = e.uOM.id) as uOM,
 (select p.name from Product p where p.id = e.product.id) as product,
 e.lineNo,
 (o.documentNo || ' - ' || to_char(trunc(o.orderDate)) || ' - ' || o.grandTotalAmount) as salesOrder,
 @operativeQuantity@ as operativeQuantity,
 @operativeUOM@ as operativeUOM,
 @orderQuantity@ as orderQuantity,
 il.id,
 e.orderDate as orderDate,
 o.scheduledDeliveryDate as scheduledDeliveryDate,
 (select wh.name from Warehouse wh where wh.id = o.warehouse.id) as warehouse,
 o.documentNo as documentNo,
 o.grandTotalAmount as grandTotalAmount
 @selectClause@
MAINFROM
@fromClause@
WHERE
 @additional_filters@
 @whereClause@
GROUP BY
@groupByClause@
</source>
As you can see, there are some elements in the query that are strings surrounded by @@. These strings represent part of our query that we can replace with more specific clauses depending on determinated conditions.
Of course this query will fail if we execute it with these undefined elements, but in this case we can use a HqlQueryTransformer, to transform the query according the scenario it is executed. To transform the C_OrderLine_PE_HQL we have the OrderLinePEHQLTransformer.java, and for M_InOutLine_PE_HQL we have InOutLinePEHQLTransformer.java.
Overriding the transformHqlQuery method we make possible to change any part of the query with more convenient code. This is the case of the transformer for the Create Lines From Order:
<source lang="java"> @Override
 public String transformHqlQuery(String _hqlQuery, Map<String, String> requestParameters,
     Map<String, Object> queryNamedParameters) {
   isSalesTransaction = StringUtils.equals(requestParameters.get("@Invoice.salesTransaction@"),
       "true");
   final String strInvoicePriceListId = requestParameters.get("@Invoice.priceList@");
   final PriceList priceList = OBDal.getInstance().get(PriceList.class, strInvoicePriceListId);
   final String strBusinessPartnerId = requestParameters.get("@Invoice.businessPartner@");
   final String strCurrencyId = requestParameters.get("@Invoice.currency@");
   final String strInvoiceId = requestParameters.get("@Invoice.id@");
   queryNamedParameters.put("issotrx", isSalesTransaction);
   queryNamedParameters.put("bp", strBusinessPartnerId);
   queryNamedParameters.put("plIncTax", priceList.isPriceIncludesTax());
   queryNamedParameters.put("cur", strCurrencyId);
   if (!isSalesTransaction) {
     queryNamedParameters.put("invId", strInvoiceId);
   }
   String transformedHql = _hqlQuery.replace("@selectClause@", getSelectClauseHQL());
   transformedHql = transformedHql.replace("@fromClause@", getFromClauseHQL());
   transformedHql = transformedHql.replace("@whereClause@", getWhereClauseHQL());
   transformedHql = transformedHql.replace("@groupByClause@", getGroupByHQL());
   transformedHql = transformedHql.replace("@orderedQuantity@", getOrderedQuantityHQL());
   transformedHql = transformedHql.replace("@operativeQuantity@", getOperativeQuantityHQL());
   transformedHql = transformedHql.replace("@orderQuantity@", getOrderQuantityHQL());
   transformedHql = transformedHql.replace("@operativeUOM@", getOperativeUOM());
   transformedHql = transformedHql.replace("@filterByDocumentsProcessedSinceNDaysAgo@",
       getSinceHowManyDaysAgoOrdersShouldBeFiltered());
   transformedHql = changeAdditionalFiltersIfIsSalesTransaction(transformedHql);
   return transformedHql;
 }
</source>
For example, the logic of how the ordered quantity is calculated taking into account if it is executed from a Sales or a Purchase Invoice is defined by this way: <source lang="java"> protected String getOrderedQuantityHQL() {
   StringBuilder orderedQuantityHql = new StringBuilder();
   if (isSalesTransaction) {
     orderedQuantityHql.append(" e.orderedQuantity-COALESCE(e.invoicedQuantity,0)");
   } else {
     orderedQuantityHql
         .append(" e.orderedQuantity-SUM(COALESCE(m.quantity, 0))-SUM(COALESCE(il.invoicedQuantity, 0))");
   }
   return orderedQuantityHql.toString();
 }
</source>
It can be as complex as you need, for example in the refactor if we are creating from a purchase invoice, the ordered quantity will not include the already invoiced quantities in the processing invoice.
How to add customized fields to the P&Es.
1. To add more customized fields is important to start createing a new transformer extending the existing ones: InOutLinePEHQLTransformer.java for shipment/receipt lines and OrderLinePEHQLTransformer.java when you want to extend the Create Lines From Order P&E.
With a transformer defined as follow it is possible to add the UOM symbol to the fields retrieved by our query:
<source lang="java"> import java.util.Map; import org.openbravo.client.kernel.ComponentProvider;
/**
* Example of how to extend the current InOutLinePEHQLTransformer
*/
@ComponentProvider.Qualifier("631D227DC83A4898BBD041D46D829D27") public class NewCustomizedTransformer extends InOutLinePEHQLTransformer {
private static final String UOM_SYMBOL = "uom.symbol";
 /**
  * You need to define a priority greater than 100 to be executed after the
  * InOutLinePEHQLTransformer or less to be executed before. In our case we going to execute the
  * logic previously.
  */
 @Override
 public int getPriority(Map<String, String> parameters) {
   return 90;
 }
 /**
  * Build a new Select clause using the base one and adding the uom.symbol field
  */
 @Override
 protected String getSelectClauseHQL() {
   String baseSelectClause = super.getSelectClauseHQL();
   StringBuffer newSelectClause = new StringBuffer();
   newSelectClause.append(baseSelectClause).append(",").append(UOM_SYMBOL);
   return newSelectClause.toString();
 }
 /**
  * Build a new Group By clause using the base one and adding the uom.symbol field
  */
 @Override
 protected String getGroupByHQL() {
   String baseGroupBy = super.getGroupByHQL();
   StringBuffer newGroupBy = new StringBuffer();
   newGroupBy.append(UOM_SYMBOL).append(",").append(baseGroupBy);
   return newGroupBy.toString();
 }
} </source>
Inside the transformer we can add relations with other tables, conditions and grouping to adapt the new query to our new requirements. In our example is just needed to add the uom.symbol to the select clause and the group by.
2. Define a new Column to the table: You should add a new column to the table to link this new field.
3. Add a new field in the corresponding P&E related with the created column.
And that's all. This way you can customize your P&E to show/hide the information you want.


