Procurement Management
| Back to User Guide |
Contents
Introduction
Procurement Management deals with all the activities related to the purchase of goods and services from external suppliers and the corresponding reporting.
This application area of Openbravo covers Requisition to Receipt and Invoicing parts of the Procure To Pay business flow and Supplier Returns business process. For Payments Management of Procure To Pay see Financial Management // Receivables & Payables application area.
Procure to Pay Business Flow
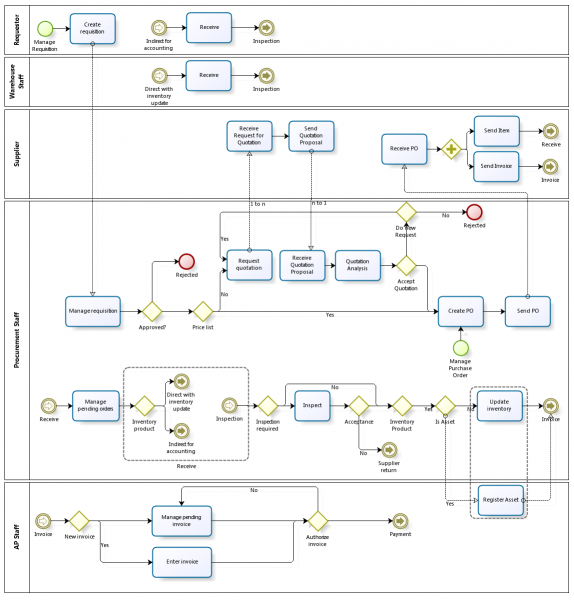
Procure to Pay workflow manages the life-cycle of a procurement process.
Due to its complexity and different roles involved it is convenient to split Procure to Pay down into two main sub-processes:
- Requisition to Receipt process starts by the creation and management of purchase requisitions and corresponding purchase orders to the moment the warehouse staff receives the merchandise.
- Supplier Invoice to Payment continues previous sub-process by registering the supplier invoices and closes it by paying supplier invoices.
Configuration
The following setup needs to be done before performing the process:
- Products
- Costing rules
- Landed Cost Types
- Business Partners (Vendors & Suppliers).
- Price configuration
Products need to be configured prior any purchase requisition is issued.
Each product that is being purchased needs to have a price in the purchase price list in order to be selectable in any transactional document like a purchase order or a purchase invoice.
Same way each product that is being purchase needs to be defined in a unit of measure ("UOM"), and in alternative unit of measure (AUM) if required.
Please refer to Product Setup, Product and Pricing for more information.
Above configuration is part of the overall Business setup flow within the "Master Data Management" setup.
The cost of an input transaction such as a "Goods Receipt" can be calculated by using the product's purchase price excluding taxes.
Besides that, the cost of the products included in a Goods Receipt can be adjusted as a result of allocating different types of Landed Costs in the receipt.
The "Costing Server" process is the new Openbravo "Costing Engine" process that calculates and adjusts product's transactions cost. This process requires that the legal entity/organization has a costing rule configured and applied to the products configured as "Stocked".
Business Partners need to be configured prior any purchase requisition can automatically turns into a purchase order.
Please refer to Business Partner Setup and Business Partner for more information.
Above configuration is also part of the overall Business setup flow within the "Master Data Management" setup.
Note: You are not required to perform any additional setups for the Procurement Management application area if you are going to explore it based on Food & Beverage (F&B) sample client shipped with Openbravo by default.
The sample data set already contains the roles, business partners, products, warehouses and prices pre-configured.
Execution
In Procurement Management the Procure to Pay business process is executed as follows:
Any member of the organization allowed to do so can directly issue a Requisition as a result of an organization or business unit need.
- The requestor creates a new document in the Requisition window, enters a "Need by date" and then looks for the product or service needed. If the product does not exist it can be entered at that time in the Product window.
- The requestor continues by adding for each product needed a new line with the need by date, the product, the quantity, the price if known and if needed its attribute (size and/or color, etc). A preferred supplier can also be added if known.
- Once done, the requisition is saved in "Draft" status allowing it could be changed later on by the purchase staff if needed.
Requisitions notify the purchase staff of products to order, their quantity and the time frame for its delivery. Purchase staff is then in charge of managing already created purchase requisitions or even create new ones if required.
- Purchase staff manages requisitions in the Manage Requisitions window.
- Purchase staff can change any data of the requisitions created in draft status, and besides can look for the supplier to be used in the Business Partner field. if the Business * * Partner does not exist, it can be entered at that time in the Business Partner window.
- Puchase staff can also enter the purchase net unit price and discounts if any, once known.
- Once the requisition is ready, it is completed. The Document Status of the requisition changes to Completed and can then turn into a purchase order.
Purchase staff:
- can massively create Purchase Order/s for the Completed Requisitions in the Requisition to Order window by searching and then adding requisition lines do not linked to an order yet. The purchase order/s created that way are shown in the Purchase Order window in Booked status.
- and can also directly create Purchase Orders in the Purchase Order window. Purchase lines are filled as in the case of the Requisition. Once the Purchase Order is ready, it is processed pressing on the Book button.
- To review past and present purchases of the supplier, purchase staff uses the Purchase Dimensional Report.
Warehouse staff:
- Receives the merchandise as well as the delivery notes attached in 2 ways:
- With the Goods Receipt window, Warehouse staff looks for the orders pending to be delivered one by one and the get corresponding order lines quantity located in a warehouse and storage bin. This window also allows to create a receipt in a manual way.
- With the Pending Goods Receipt window. Warehouse staff can massively select the purchase order lines being delivered and locate the quantity receipt in a warehouse and storage bin.
- Allocates landed cost if any to the products included in a receipt by:
- selecting a landed cost type and entering an "estimated" landed cost amount which will be distributed among receipt lines
- or by selecting a landed cost type and entering a landed cost amount already invoiced which will also be distributed among receipt lines.
- Completes the receipts.
- Completed receipts updates stock information (product levels go up) and can be posted to the ledger therefore product assets accounting is being increased.
- A Goods receipt can only be posted if the cost of the products being receipt has been calculated. For doing so Costing Background process needs to be run.
- Matched Invoices window helps to manage and post the discrepancies if any between the accounting of the receipt and the accounting of the corresponding invoice later on, due to purchase price differences.
- Goods Receipts Dimensional Report is used to review past receipts of the Business Partner.
Finance staff:
- Registers supplier invoices in different ways:
- With the Goods Receipt window, Finance staff can generate an invoice from a Receipt in status Complete.
- With the Purchase Invoice window, Finance staff can enter supplier invoices:
- in a manual way
- or by retrieving purchase orders or receipts lines pending to be invoiced
- or by copying invoice lines from existing purchase invoices.
- Registers landed cost invoices and match those "invoiced" landed costs with the landed costs:
- booked directly in a receipt(s)
- or booked through a landed cost document.
- Processes and Posts landed cost matching.
- Once a Purchase Invoice is Processed a Payment Plan of the invoice is created based on the payment terms agreed with the supplier and the purchase invoice can be posted to create the accounting entries of the invoice. Afterwards, the payment plan can be modified.
Additionally:
- The Matched Purchase Orders view helps Finance staff to have a look at the order or receipt lines which have not been invoiced yet by a supplier.
- Finance staff is able to review past supplier invoicing information in the Purchase Invoice Dimensional Report
Purchase expenses can be recognized in different ways:
- In most cases companies would recognize the expense as soon as the purchase is made. For instance a company buying consumable products that are not capitalized. In Openbravo, in this situation, the expense is generated as part of the accounting of the purchase invoice corresponding to the transaction.
- Under some circumstances, however, it is required to defer the expense recognition. For instance a company purchasing a business insurance for the duration of a year would want to distribute that expense over 12 months. In Openbravo, in this situation, the expense can be deferred within a given number of periods by entering an expense deferred plan in the purchase invoice lines.
For a full description of this functionality please review the How to manage deferred revenue and expenses article.
Finally, the finance staff is in charge of making and managing the supplier payments:
- Supplier payments can be made in the Purchase Invoice window by using the Add Payment button. It is also possible to made a prepayment against a Purchase Order.
Detailed payment management documentation is available in the Financial Management // Receivables & Payables application area and in the How to manage prepaid invoices in payables article.
Supplier Returns Business Flow
This workflow manages the return of purchased goods back to the supplier. Due to the consequences of returning it is convenient to split Supplier Returns down into two main sub-processes:
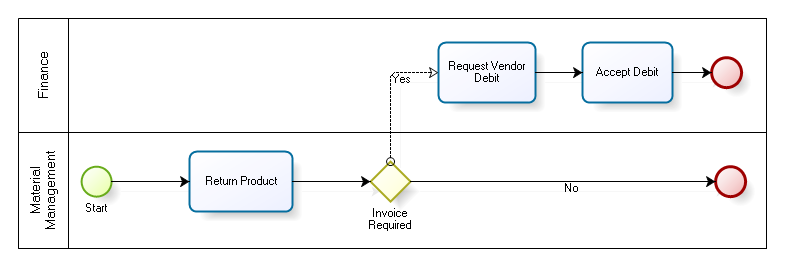
- Supplier Return to Debit: This process manages the return of goods back to the vendor and the request of a debit.
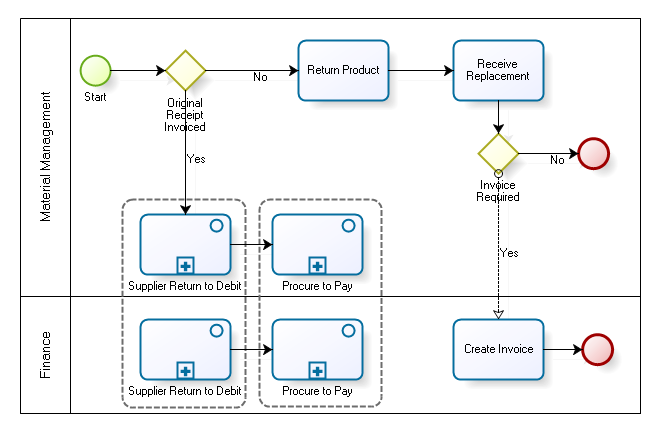
- Supplier Return to Replacement: This process manages the return of goods back to the vendor and the request of a goods replacement.
Transactions
- Requisition
- Manage Requisitions
- Requisition To Order
- Purchase Order
- Goods Receipt
- Pending Goods Receipts
- Purchase Invoice
- Matched Invoices
- Return to Vendor
- Return to Vendor Shipment
- Landed Cost
Analysis Tools
- Purchase Order Report
- Purchase Dimensional Report
- Goods Receipts Dimensional Report
- Purchase Invoice Dimensional Report
- Matched Purchase Orders
Advanced
| Back to User Guide |


