Upgrading From 2.50
Contents
Overview
This document explains how to upgrade from 2.50 to 3.0 using Openbravo UI.
It is the recommended upgrade path. Alternatively, it is also possible to manually upgrade from sources, this second way is not generally recommended and should be only executed by experienced developers.
Upgrade to 3.0
| It is important to execute upgrade process first in the test environment, verify application works and only after it repeat upgrade for the production system.
It is recommended to use Production to testing replication tool to clone production environment into a testing environment. |
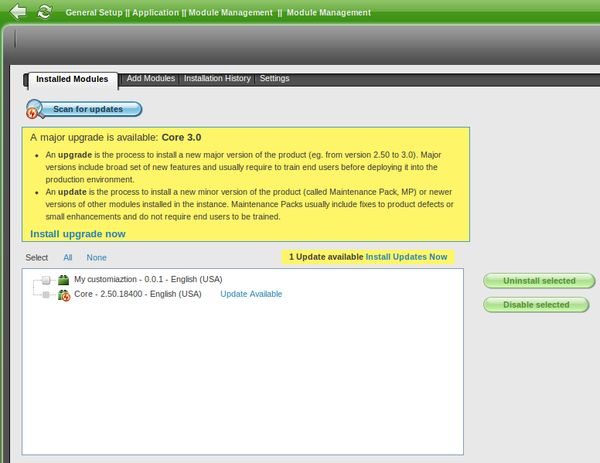
Upgrade process is launched in the same way module update is done, through MMC in the application (General Setup || Application || Module Management || Module Management) by clicking the Scan for Updates button. At this moment, it is looked in for the latest version of the installed modules and for the existence of new major versions of core.
In case there is a new major version available for core, the upgrade flow can be started by clicking on the Install upgrade now link in the yellow box in top of modules box.
New versions for upgrade are detected taking into account module maturities (same as for updates), so only in case there is an Openbravo 3 version with at least the minimum maturity accepted, it will not be shown in as upgrade available. Even in 2.50 Community instances are allowed to restrict to Confirmed Stable maturity, from Openbravo 3 they are allowed to restrict to QA Approved level at most, this last level is taken into account for upgrade of Community instances in case Confirmed Stable is in set, which is still used for updates.
Note that upgrade and update are two different flows that can be executed independently. This means that even there is an upgrade for Openbravo 3, it is still allowed not to upgrade but to install newer versions of Openbravo 2.50.
The upgrade process implies the following steps:
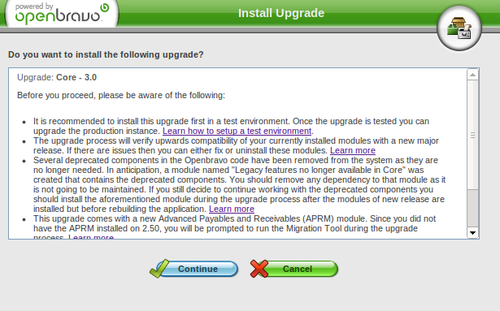
Information Window
Just after starting the process, a window with detailed information about the upgrade is shown. Please, do not continue unless you completely understand and agree with the topics stated there.
Extend Module Dependencies
Dependencies Validation
In order to be able to successfully upgrade, it is needed all modules in the instance are Openbravo 3 compatible. At this point, this is verified remotely. It is checked that all the modules in the instance are already compatible with Openbravo 3 and in case they are not it checks whether a newer version of this module is compatible.
In case there are modules that do no satisfy these requisites a message informing about this fact is displayed. Until these problems are fixed, it will not be allowed to continue to next step.
There are two possible cases of error:
- Maturity level problems: In case the installed version of a module is not compatible with Openbravo 3 and there is a newer published version, but this version is in a maturity level lower than the one accepted in the instance, this message is shown. At this point you can wait until module owner promotes the new version to a level that is accepted in your instance; or you can relax the maturity level you accept for updates to, at least, the one the new version is published in. Maturity level are configured in Settings tab of Module Management window.
- Dependency problems: It occurs when the installed module does not define a dependency compatible with Openbravo 3 and there is not a published version of this module that defines it. If the incompatible modules are developed third parties, you might consider contacting their maintainers to publish new versions or uninstalling them; note that if you uninstall the modules you irreversible will lose data saved within in them. You should extend dependencies for all the modules owned by yourself, this is: the ones for configuring the instance (such as your template) and all the ones implemented by you. Extending dependencies is a simple task that can be done following the steps bellow, for further information about extension of dependencies and module migration you can read How to Migrate 2.50 Modules to 3.0 document.
- Open Module window and select the module that is not compatible with Openrbavo 3 and set is as In Development.
- Go to its Dependency tab and look for its dependency to the module that makes it not Openbravo 3 compatible (usually Core).
- Extend this dependency by completing the Last Version field with the correct version. In the case of Core, 3.0.0.
- After fixing all your modules persist database information to xml files by executing ant export.database.
Installation & Build
The following steps are the same ones that are the one taken for standard module update. Consisting in installing the modules that are downloaded from Central Repository and rebuilding the system to apply the new changes.
There are just some particularities in the modules that are pulled.
Distribution
Unlike 2.50, Openbravo 3 is a distribution of modules.
Openbravo 2.50 is a single Core module that provides all UI and ERP functionality in top of which it is possible to install additional modules to extend it.
Openbravo 3 is a distribution of modules. This means not only Core is part of it, but there are many other modules that make Openbravo 3 together. In the same way as in Openbravo 2.50, on top of Openbravo 3 distribution it is possible to install optional module to extend functionality. When installing the upgrade, you will notice that all these modules are installed together with Core.
Advanced Payables and Receivables
Openbravo 3 uses a new flow to manage payables and receivables: Advanced Payables and Receivables Management (APRM). Which is distributed as a module part of Openbravo 3 distribution and as an optional commercial module for Openbravo 2.50.
In Openbravo 2.50 is possible for commercial instances to use APRM flow, in this case the upgrade process does not do anything with APRM.
When upgrading instances that do not use APRM, APRM and APR Migration Tool modules are installed during the process. After upgrading, it will be required to run the migration. You can find more details on how to do so here.
Before running the upgrade process, in order to validate a successful migration of the payables and receivables management, use 'old' Payment Report in order to get a picture of all the outstanding payments grouped by business partner. You should first query for receivables and then for payables. Save both in pdf format, it will allow to compare the result after the migration.
Latest Versions
Upgrade process, does not only upgrade Openbravo to 3, but it also updates all modules to their latest version.
During the upgrade process, all the latest versions of all the modules installed in the instance are tried to be installed (if they are compatible and their maturity level is accepted).
In case of modules that are discontinued because are merged within another module. The module that defines the merge is installed and the discontinued one is uninstalled.
Cleanup Project
Several deprecated components in Openbravo code have been removed from the system as they are no longer needed by the core deprecation. In anticipation of a modified Openbravo 2.50 instance using a deprecated component we have created a module named “Legacy features no longer available in Core” to make the upgrade easier. Those instances should remove any dependency to that module as it is not going to be maintained! Besides a new public module named "Import Data" is also available. This module contains all the components related to the old Import Data Load functionality that is replaced in Openbravo 3 with Initial Data Load module.
For more information on this please take a look at the Code Cleanup project page.
If Legacy features no longer available in Core module is needed, it should be installed after the installation of the upgrade but before rebuilding it, making in this way just one rebuild.
Last steps
Now you have upgraded to Openbravo 3 but there is still some pending work to do.
During this period of time until the upgrade process is completely finished, it is possible to login in Openbravo 3, but just after System Administrator login, a popup will be shown explaining the next step to be taken. For the rest of roles System Under Maintenance pop up will be shown.
Run APRM Migration Tool
If APRM was not in use in 2.50, Migration Tool was installed during the upgrade process. Now it must be run before Openbravo 3 is operable. Here you can follow the instructions.
Once the migration has been completed successfully we should use the new Payment Report and compare the result with the pdfs saved before upgrading the instance. They should match.
Field Layout
In generated windows Openbravo 2.50 uses a 2 columns layout whereas Openbravo 3 uses a 4 columns layout. Forms in Openbravo 3 also have new components like Status Bar, More information section and some others. Because of the above fields in standard Openbravo 3 windows have been seriosly re-positioned in comparison to Openbravo 2.50.
Due to this changes in fields position done through Configuration Templates in 2.50 do not make sense in Openbravo 3 (field positioning in saved Configuration Script as absolute position in the tab). Therefore fields position changes are removed from Configuration scripts of Templates exported in 2.50 during upgrade process.
If your instance contains Template(s) not exported within Openbravo 3, you will be notified about this fact after log in as System Admin. You should review that windows your template changes are properly visualized in Openbravo 3 and fix their field positions (if required). You can use new Window Personalization feature available in Openbravo 3 to easily change the order and visibility of fields and edit several other settings directly from the form UI itself or let each end-user tune it for themselves. After that you can export your configuration script. Note that the fields position change (once again if it is still needed with Openbravo 3 new layout) can be done later at any point in time and you can just export configuration script to continue with the upgrade process. To export it follow these steps, in case you have several templates in your instance repeat them for each template:
- Go to Module window and set your template in development.
- In command line execute ant export.config.script
Upgrade Completed
Now upgrade to Openbravo 3 is completed. You need to verify everything works as expected.

