How to create a QueryList Widget
Contents
Introduction
This HowTo describes how to create a new widget that implements the Query/List Widget superclass. The generic documentation about what are widgets can be found here.
A related Howto explaining how to embed a widget into a generated Window/Tab can be found in this other document.
Developing the widget
The new widget like all developments must belong to a module. Create a new one if you still don't have it.
Create the widget
All the widget definition is done in the Widget window.
Create a new widget class:
- Widget title
- is the title that appear on the widget header. Put here a short sentence that describes the widget.
- Superclass & Widget superclass
- leave the flag unchecked and select the Query/List superclass widget from the drop/down menu.
- Height
- set up any value, the Query/List override this value setting up the height based on the number of rows.
- Enable for all users
- Check it if the widget has to be available to all roles. Otherwise leave unchecked and give access to the desired roles on the Widget Access tab.
As the widget is implementing a superclass widget some parameters might have been created to the new widget. On the Query/List case the Number of Rows parameter is created automatically. This sets the number of rows visible on the grid.
Create the query
The HQL query is defined on the Query tab. At this moment it is not possible to validate the HQL from the application so it is recommended to design it on an external tool. Eclipse has a nice plugin for it. All columns on the select clause must have a unique alias. These aliases are used later to define the grid columns.
As the screenshot doesn't show the full text of the HQL used in our HowTo the following shows it in more detail. In query there are a few special things to notice:
- Use of named aliases like orderId and organizationName. Those relate to the columns of the HQL-result to the grid-columns visible for the user which are explained further down in the Column section.
- Expressions like :productname -> HQL named parameters which relate to defined Parameters of the widget explained in the following.
- @optional_filters@ keyword, which defines the position where the Widget will automatically add extra filters like the standard client & organization filters.
<source lang="SQL"> select ol.salesOrder.id as orderId, ol.salesOrder.organization.name as organizationName,
      ol.salesOrder.orderDate as dateordered,  ol.salesOrder.scheduledDeliveryDate as plannedDeliveryDate,
      ol.salesOrder.documentNo as salesorder, ol.salesOrder.businessPartner.name as bpartner,
      ol.product.name as productname, ol.attributeSetValue.description as attribute,
      ol.uOM.name as uom, ol.orderedQuantity as totalqty,
      (select coalesce(sum(po.quantity),0)
       from ProcurementPOInvoiceMatch po
       where po.goodsShipmentLine is not null and po.salesOrderLine = ol) as qtyReceived,
      (select ol.orderedQuantity-coalesce(sum(po2.quantity),0)
       from ProcurementPOInvoiceMatch po2
       where po2.goodsShipmentLine is not null and po2.salesOrderLine = ol) as qtyPending
from OrderLine as ol
left join ol.attributeSetValue
where ol.salesOrder.client.id =:client and
      ol.salesOrder.organization.id in (:organizationList) and
      ol.salesOrder.documentStatus='CO' and
      ol.salesOrder.salesTransaction=false and
      ol.orderedQuantity <> (select coalesce(sum(po3.quantity),0)
                             from ProcurementPOInvoiceMatch po3
                             where po3.goodsShipmentLine is not null
                             and po3.salesOrderLine = ol) and
      ol.salesOrder.scheduledDeliveryDate<=now() and
      ol.product.name like :productname and
      ol.salesOrder.businessPartner.name like :suppliername and
      ol.salesOrder.documentNo like :documentno and
      ol.salesOrder.organization.name like :organizationName and
      @optional_filters@
order by ol.salesOrder.scheduledDeliveryDate, ol.salesOrder.documentNo </source>
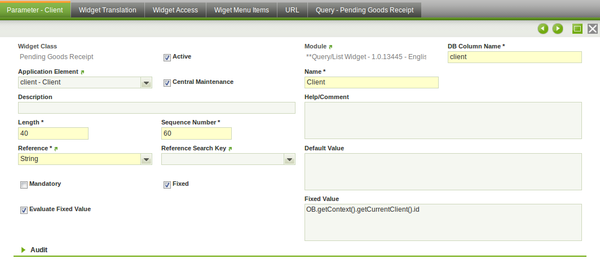
It is possible to use named parameters on the query. Each named parameter must have a matching Parameter defined on the Parameter tab:
- DB Column name
- it must match the name used on the named parameter.
- Fixed & Fixed Value & Evaluate Fixed Value
- when the flag is checked it is mandatory to enter the fixed value. If the Evaluate Fixed Value is checked the value has to be a javascript expression that it is validated on real time. It is recommended to add a filter by client id on all your queries using a named parameter and a fixed value with the following javascript expression: OB.getContext().getCurrentClient().id. If the parameter is not fixed it will be prompted to the user on the Edit settings window.
- Name
- is the label of the field of the parameter on the Edit Settings window.
Create the columns
Once the query is defined and the necessary parameters created is time to define the columns that will be available on the grid on the Column tab:
- Name
- is the label of the column.
- Display expression
- it has to match an alias of the query, it is the column of the query that will be displayed on the grid.
- Reference
- it sets the type of cell on the grid.
- Include in
- sets where is included the column.Widget view: included in all cases, Maximized view: not shown on the widget view and Exported File only included on the exported file.
- Sequence number
- sets the order of the columns.
- Width
- sets the width of the column on the grid in percentage.
- Has link & Link Expression & Tab
- it is possible to set up links on the cells to tabs of the application. The Link Expression has to be an alias of the query that returns a record id of the selected tab.
- Summarize Type
- numeric columns can be summarized on the summary row. Available options are sum, average and count. It is not supported using summaries in columns that are defined using subqueries or using a summary function. For instance, if the qtyonhand column is defined in the query like this sum(ps.quantityOnHand) as qtyonhand, it will not be supported using it with a not empty summarize type. If you set the summarize type of a column that is defined using an alias, you must also set the Where Clause Left Part field.
- Can be filtered & Where Clause Left Part
- configures the ability to filter the grid by the column on the maximized view using the filter row of the grid. It is mandatory to define the left part of the where clause. This is usually the expression of the select clause identified by the alias set on the Display Expression field. It is also mandatory to define where in the HQL has to be included the where clause. There are 2 possibilities to achieve this: including the Display Expression value enclosed in "@" symbols in the where clause of the HQL or including the @optional_filters@ string.
- Clientclass
- (Since 3.0MP20. Issue 22902) In the same way that in the from/grid view, a custom canvas item can be added within the Quert List grid.
- Example 1: To add a % sign in an existing field:
- Set as "Clientclass" the following value "OBAddPercentageSign"
- Example 2: To add a 'Print' link button in a new column
- Create the new column
- Name: the column header title
- Display Column Alias: it doesn't mind the value, but ensure that is not used in any other column
- Reference: it doesn't mind the value, but 'String' works ok
- Width: the desired column width. "15" should be enough
- Has Link: checked
- Link Column Alias: point to the hql result matching the id of the record you want to print
- Tab: point to the tab which belongs the record you want to print
- Clientcanvas: set the following value "OBQLCanvasItem_Print"
- Note that this 'Print' button works for PDF documents (like, for example, 'Sales Invoice' print behavior). For in-screen cards (like, for example, 'Business Partners' print behavior), the "Clientcanvas" value should be "OBQLCanvasItem_Print {"isDirectPDF": false, "title": "Print BP"}"
In the example of the image. The display expression alias is salesorder. In the HQL this alias is defined like: ol.salesOrder.documentNo as salesorder. So in the Where Clause Left Part is set ol.salesOrder.documentNo. In the HQL as we want to be able to filter by all the columns and all the where clauses have to be set on the same where statement it is added AND @optional_filters@. For this column we could have added as well the following code: AND @salesorder@.
Adding the widget to your workspace
Once the widget is done if you have access to it you are able to add it to your workspace. It is not needed to compile anything.
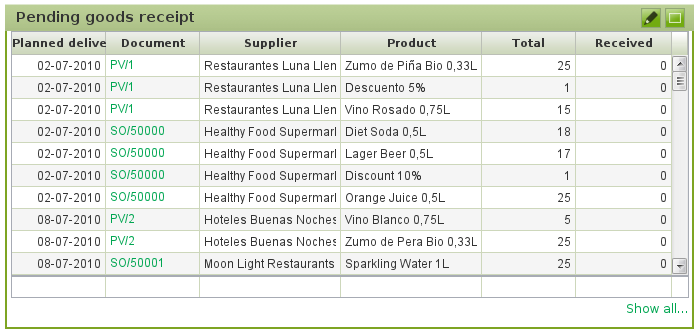
On the Add widget menu select your new widget. If all the parameters have a default value or are fixed you will see the widget added on the workspace. Otherwise you will be prompted to fill the parameters.
And the final result:


