How to add Columns to a Table
How to add columns to an existing table
Objective
Extend the table create in the previous How to Create a Table Howto to include additional fields.
In this howto three different fields will be added to show how to configure some of the possible references:
- ValidTo, a simple date-field matching the ValidFrom date already present in this table
- Payment Schedule, shown as a combobox to the user to be able to choose from three values defined in a list-reference.
- First day of the month
- Mid of the month
- Last day of the month
- Payment Category, a link to another existing table which allows selecting among the values present in that table.
These changes can be done in two different locations:
- Add columns to the original module (dbprefix HT)
- Create a second module (dbprefix HT2) which adds the columns to the first module
The first option can be chosen if the original module author wants to add more columns to his/her module. The second option is possible for anyone as the columns are added by a new module to the existing one which is not changed directly.
The main difference between these two methods is the names which need to be chosen for the columns to comply with the modularity naming rules.
- Adding column to same module: Any valid column name can be picked
- Via second module: New column name must comply to the pattern EM_<DBPREFIX>_ where <DBPREFIX> must be the dbprefix if the new module contaning the column to be added. In this example: EM_HT2_
For the rest of the howto we follow this second approach and will place all new elements into a new module with dbprefix HT2.
The next Howto will continue with adding the new columns to the window defined on top of the ht_salary table.
To show how different types of column are configure we will be adding 3 new columns:
- Valid To a simple column of type date
- Payment Schedule a list-reference containing a list of values: Start of Month, Mid of Month, End of Month
- Salary Category a reference pointing to the existing Salary Category table.
Creating the new module
This section only lists the main important elements needed for the new module. More details can be found in the How to Create and Package a Module tutorial.
- dbprefix: HT2
- Dependencies:
- Core as usual
- Openbravo Howtos module (>= 1.0.0) is also needed as this new module adds columns to that existing one, and so needs to ensure the first module is present.
Creating the columns in the database
| Column name | Type | Length | Note |
|---|---|---|---|
| em_ht2_validto | DATE | Date that this salary is valid to. | |
| em_ht2_payment_schedule | VARCHAR | 60 | When the salary is paid |
| em_ht2_c_salary_category_id | VARCHAR | 32 | Link to the Salary Category |
To create the above table within the database, use one of the following ALTER TABLE statements depending on the DB you are using:
PostgreSQL <source lang="sql">
 ALTER TABLE ht_salary ADD COLUMN em_ht2_validto timestamp without time zone;
 ALTER TABLE ht_salary ADD COLUMN em_ht2_payment_schedule VARCHAR(60);
 ALTER TABLE ht_salary ADD COLUMN em_ht2_c_salary_category_id VARCHAR(32);
 ALTER TABLE ht_salary ADD CONSTRAINT "em_ht2_c_salary_category" FOREIGN KEY (em_ht2_c_salary_category_id) REFERENCES c_salary_category(c_salary_category_id);
</source>
As can be seen in the SQL a foreign key is added along with the new field linking to the c_salary_category table. This ensures that only existing categories can be selected and also that no salary category can be deleted as long as it is used in the ht_salary table.
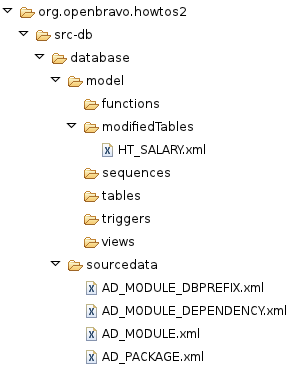
Taking a look at the folder structure of the module after running ant export.database shows that the new columns have been exported into a file in a 'modifiedTables' folder instead of the usual 'tables' to indicate that this module does not create the ht_salary table but instead is adding new elements to it.
Adding & Configuring the columns in the Application Dictionary
In this part we will add the newly added column to the list of columns already defined for the ht_salary table and then configure those column definition to match the description giving in the objective section above.
Adding the new column to the Application Dictionary
This is the same process as described in the previous HowTo.
- In the 'Tables and Columns' window search for the entry of the ht_salary table.
- With this record selected, run the 'Create columns from DB' process. As the table already contains several column only column which are not yet present in the Application Dictionary definition of that table will be added. In this HowTo this process will add our newly created 3 columns to the list. Notice that those new entries are automatically associated with the new module with prefix HT2 as the process detected this via the naming of the database columns.
Configuring the new columns
Before starting to configure the new columns two preparatory steps need to be done.
- Create a List Reference for the column Payment Schedule, to define the 3 values which should be allowed for this list.
- Create Table reference for the em_ht2_c_salary_category_id column as the standard TableDir' reference cannot be used with em_ type columns.
When adding these new elements care should be taken to place them in the new module with prefix HT2.
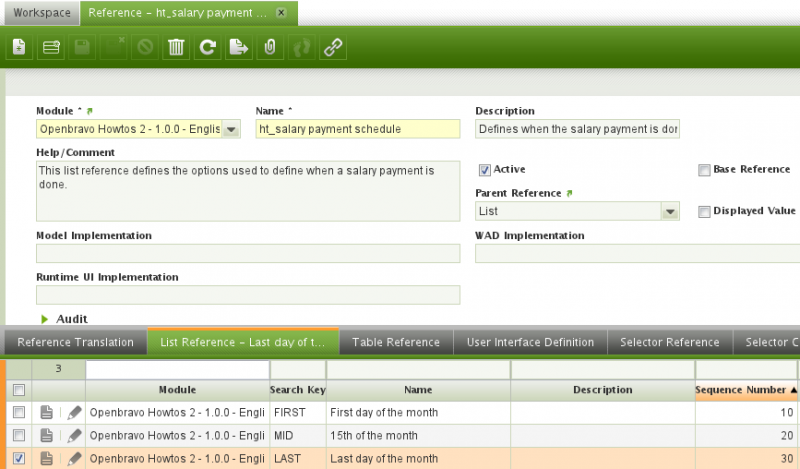
The first step is to create a new 'Reference' to hold the list of values for the Payment Schedule column. Important values to configure here are:
- Parent Reference = 'List' in the Reference definition itself, to define it as a List Reference.
- For each entry in the List Reference tab
- Search Key The value stored in the database field when this entry in selected by a user in the ComboBox.
- Name The user visible (translatable) text shown in the UI.
- Sequence to define the order of the entries which should be used in the UI.
The following screenshot shows how the defined reference will look like.
The second step is to create a 'Table Reference' do define how the new 'Salary Category field is linked with the c_salary_category' table.
For this again a new 'Reference' needs to be created. In this case the important values for it are the following:
- Parent Reference = 'Table to denote this is a Table Reference.
- In the Table Reference Tab:
- Table = c_salary_category' as this is the target table our new column will be pointing to.
- Key Column = c_salary_category_id as this is the primary key of the target table
- Display Column = Name to denote the field of this table which should be shown in the UI for this column.
Again the following screenshot shows how the defined reference will look like.
After this two preparatory steps we can finally configure the new columns to use the reference we just created.
In the 'Tables and Columns' window we search for the entry to the ht_salary table. In the column tab we make the following changes for our new columns:
- Payment Schedule, change the Reference of this column from String to List and change the Reference Search Key to our newly created List Reference with name EM_Ht2_Payment_Schedule.
- Salary Category, change the Reference of this column from TableDir to Table and change the Reference Search Key to the new ht_salary_c_salary_category.
The final step would be to run the Synchronize Terminology process and update the created elements to have useful names for the UI.
However as long as issue 10886 is unfixed this process will not map existing elements correctly for columns following the EM_ naming rules.
To work around this and reuse the existing core elements for the two columns for which such exists (validto, Salary Category) assign the existing elements manually to those two columns.
For this the following changes are needed in the same open window Tables and Columns still open from the last step and in the Columns tab of the ht_salary table.
- ValidTo change the Application Element to ValidTo - Valid To Date
- Salary Category change the Application Element to C_Salary_Category_ID - Salary Category
Now run the Synchronize Terminology process to set element for the last column which does not yet have a matching element.
After this the new columns should look like shown in the following screenshot:
As a final step we now update the newly create EM_Ht2_Payment_Schedule element to have a useful label for the UI.
Navigating to the Application Dictionary || Element we search for the new element and to the following updates:
- Name change from EM_Ht2_Payment_Schedule to Payment Schedule
- Print Name change from EM_Ht2_Payment_Schedule to Payment Schedule
Those updates are needed to have useful labels in the UI for any windows defined on this table and to avoid those having internal names using the technical EM_-terminology.
Rebuilding the system
Finally to make the newly added columns available at runtime ant generate.entities needs to called and the changes deployed to tomcat. Those to steps can be done together by calling ant smartbuild. After that Tomcat must be restarted to refresh the DAL In-Memory Model so it knows about the newly added columns.
This concludes the How To on adding new columns to an existing table. Now might be a good time to export your module.
To add the new columns to the window defined on top of this table go ahead to the next How to add a field to a Window Tab.

