Client Side Development and API
Contents
- 1 Client Side Development Tools
- 2 Presentation on Openbravo 3.0 client side development
- 3 Openbravo processing of javascript code
- 4 The smartclient.dev module, smartclient console and sources
- 5 Getting non-minimized and non-obfuscated javascript
- 6 Debugging Client Side Code
- 7 Analyzing Client-Server Requests
- 8 Adding javascript to Openbravo
- 9 Implementing global-singleton javascript objects
- 10 Openbravo Client Side Components - Javascript API
- 10.1 UI Architecture - Blog post
- 10.2 OB.Application - general application information
- 10.3 OB.User - the current user
- 10.4 OB.Constants - common constants
- 10.5 OB.Datasource - getting standard and custom data sources
- 10.6 OB.Format - format patterns
- 10.7 OB.I18N - getting labels
- 10.8 OB.PropertyStore - handling preferences
- 10.9 OB.RemoteCallManager - calling the server from the client
- 10.10 OB.ViewManager - Opening Views
- 10.11 OB.Utilities.Action - actions execution related utilities
- 10.12 OB.Utilities.Number - number related utilities
- 10.13 OB.Utilities.Date - date related utilities
- 10.14 OBGrid
- 10.15 Openbravo Window Components
Client Side Development Tools
Client side development is a combination of javascript, css and very limited html. Programming is done in javascript which is loaded in the browser. The browser is the main client platform. Within the client we use the following development tools:
In this page we will show the Chrome Developers Tools as this is the tool we used most of the time.
Presentation on Openbravo 3.0 client side development
The following link provides an online presentation on Openbravo architecture and client side development: http://planet.openbravo.com/?p=48043
Openbravo processing of javascript code
When developing client side code it is important to understand how Openbravo pre-processes the javascript code before sending it to the browser. The caching and compression section of the developers guide is important to read.
Openbravo will concatenate all static resources (javascript and css) in one large file before sending it to the client. Depending if a module is in development the javascript is:
- no module in development: minified/compressed (using jsmin)
- there is at least one module in development: checked with jslint (combined with jslint4java)
The javascript code is generated into a file which has a name based on a guid (for example 088afd247a8fe06c91a654891a1358a2.js). This guid is again based on the content of the file, so if the javascript changes then also the js file name is changed (and therefore reloaded in the browser). The js file is generated into the web/js/gen folder and served from there to the client.
Note: the Smartclient source code is always delivered minified and obfuscated. See a next section below for information on how to get non-obfuscated Smartclient version.
The smartclient.dev module, smartclient console and sources
When working with Openbravo client side code it can make sense to also install the smartclient source code module. You can find it here. To install it, go to the modules directory in your development project and in the console type in this: <source lang="bash">hg clone https://code.openbravo.com/erp/mods/org.openbravo.userinterface.smartclient.dev/ </source> and in the top level project directory do this: <source lang="bash">ant smartbuild -Dlocal=no </source>
And refresh eclipse so that eclipse sees the modules content. Inside eclipse you can open a smartclient js file with the key combination: shift-ctrl-r, enter for example FormItem.js to see the FormItem source code.
After installing the smartclient source module you can also use the smartclient console in the client, in the address bar of the browser (after loading openbravo) do this: <source lang="javascript">javascript:isc.showConsole(); </source>
Within the smartclient.dev module you can find the docs directory which contains the reference manual and the quick start guide.
Getting non-minimized and non-obfuscated javascript
As explained above, Openbravo will automatically try to minimize javascript code for best loading performance. However, this makes debugging in the client side very difficult, therefore there is an easy way to prevent minimizing of javascript.
Openbravo Javascript
The javascript of modules is minimized if the module is not in development. So to prevent minimization of your javascript put your module in development. The most common modules to have in development for Openbravo are:
- org.openbravo.client.kernel
- org.openbravo.client.application
- org.openbravo.userinterface.selector
Smartclient code
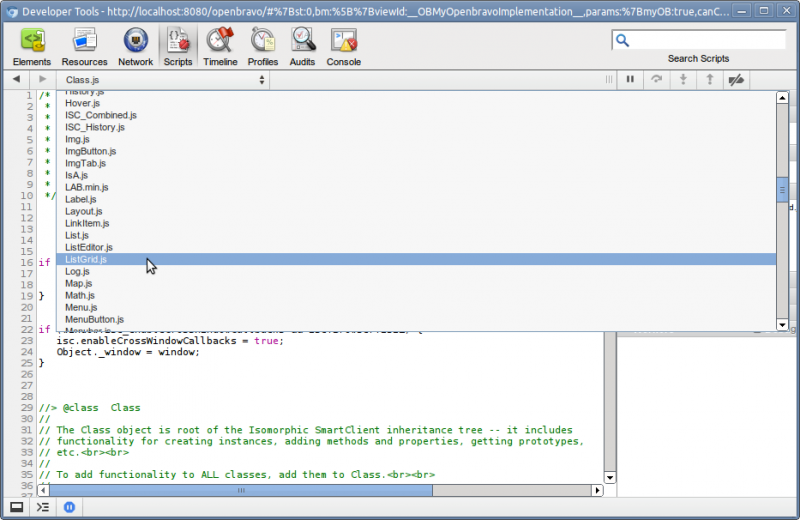
The Smartclient library is normally minimized/obfuscated as this gives the best performance when loading the libraries. However, for debugging and understanding the source code it really helps to have the non-obfuscated code loaded in the client. To use the non-obfuscated code in the browser you have to install the org.openbravo.userinterface.smartclient.dev module (and do ant smartbuild -Dlocal=no after installing).
Then start the application and place the org.openbravo.userinterface.smartclient.dev in development. After that restart the application.
Then when debugging (see next section) you can view/use the non-minimized Smartclient source code:
Debugging Client Side Code
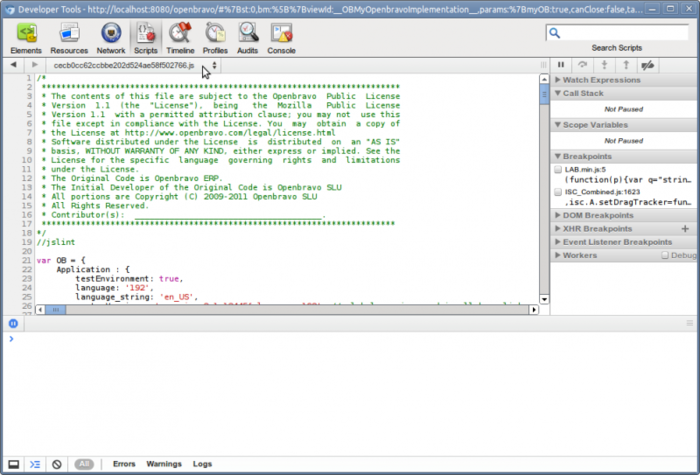
Debugging client side code is done through the Chrome Developers Tools. After opening Openbravo in a browser window, open the Chrome Dev Tools. Click the Scripts button in the top and in the drop down just below it, find the file which has a guid-like name.
This js file contains the complete concatenated javascript code, some remarks:
- the file name is a dynamically generated guid, it is different in different installations and Openbravo versions
- if the javascript is minified then put one of the core, client application or client kernel modules in development and restart the application
- the Smartclient javascript code is not included in this file
Create a Breakpoint
The chrome development tools offers several ways to set breakpoints. For example to pause on exception or pause on uncaught exceptions. For more details see this chrome dev tools documentation.
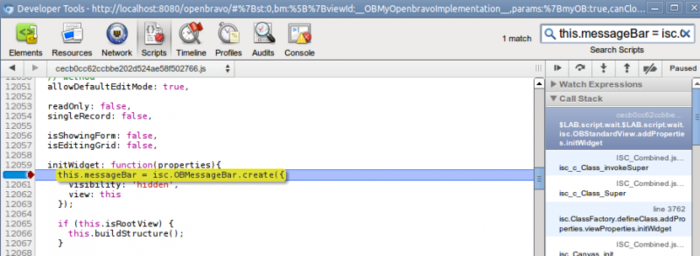
To do some debugging, enter this string 'this.messageBar = isc.OBMessageBar.create({' as a search string in the search field in the top. Then click on the left, on the line number, to create a breakpoint. Now to test the breakpoint open a window in Openbravo. The breakpoint should be hit.
Finding Global and Smartclient Components
All Smartclient components are accessible globally:
- The class definitions are all in the isc object.
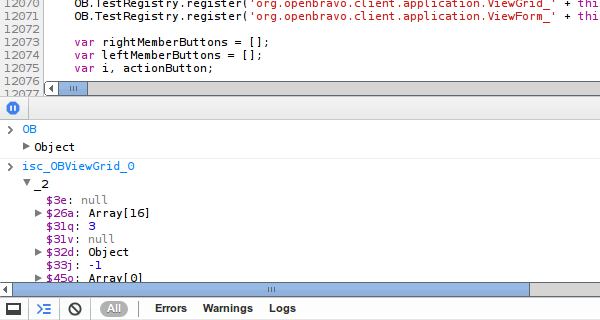
- The instances are stored in global variables with this structure: isc_[ClassName]_[SequenceNumber], for example isc_OBViewGrid_0, isc_OBViewForm_0.
You can type in the global variables and objects directly in the console:
Finding javascript errors in your own code, stopping on exceptions
When an exception occurs in your javascript code and you have the chrome dev tools open, then often the chrome dev tools will stop the program execution in obfuscated Smartclient code.
To stop the debugger in your own code let chrome stop on exception. This is described in more detail here: pause on exception or pause on uncaught exceptions.
Analyzing Client-Server Requests
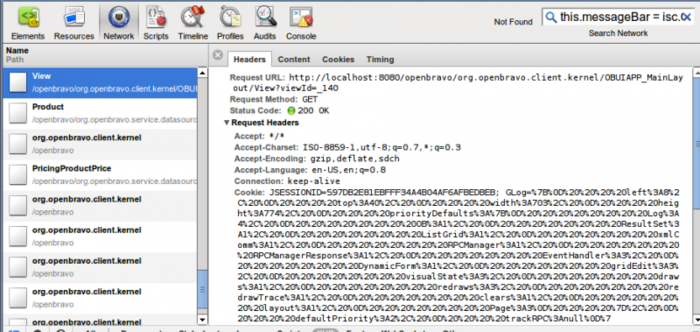
While working with Openbravo the system will do several requests to the system. Requests are done for images, data and view definitions. The Chrome Developers Tools provide the network tab to see which requests actually take place. The most interesting one's are the xhr requests.
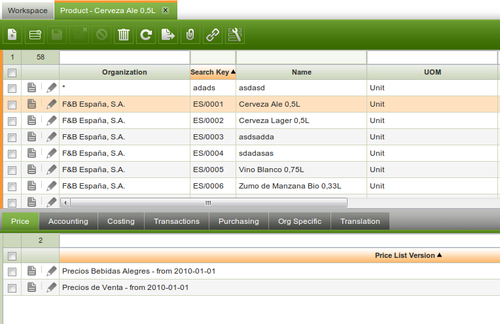
The image below illustrates the requests done when opening the product window:
A summary:
- the view request gets the javascript code for the product window (and all its tabs) from the server. This call is only done if the view has not been cached in the browsers cache.
- the first org.openbravo.client.kernel requests gets the dynamic information related to this window, this call is never cached
- the Product and PricingProductPrice are so-called datasource requests, they get the records shown in the grids and forms. Only the data for the visible tabs is retrieved
- the other org.openbravo.client.kernel requests are calls to the alert manager, it checks if there are open alerts.
You can see the returned content by clicking the content tab.
Adding javascript to Openbravo
In the Openbravo 3 architecture a significant part of the logic is implemented in (generated) javascript. Solution providers implementing new functionality can add new functionality in javascript also. Openbravo takes care of checking, minimizing, loading and caching of javascript. To make use of this framework functionality, javascript has to be added to Openbravo in the following way:
- the static javascript should be located in files in this subdirectory of the module: web/[modulepackage]/js
- the javascript needs to be registered in Openbravo using java, implemented in a so-called ComponentProvider. This is explained in more detail here. Here is a code snippet which shows how a js file is registered:
<source lang="java">globalResources.add(createStaticResource(
"web/org.openbravo.client.application.examples/js/example-view-component.js", true));</source>
Implementing global-singleton javascript objects
When creating global-singleton javascript objects it is good practice to add these objects to a single global object to prevent global namespace pollution.
The recommendation is to use both the global existing OB javascript object as well as the module's db prefix. For example the Openbravo Application Example module has the OBEXAPP dbprefix. The correct way of creating a global singleton is: <source lang="javascript"> OB.OBEXAPP = {}; OB.OBEXAPP.OnChangeFunctions = {}; </source> So first create/add an object to the global OB object, the added object should be named using the module's dbprefix. Then the application specific properties can be added to this global object.
In the Openbravo 3 architecture a significant part of the logic is implemented in (generated) javascript. Solution providers implementing new functionality can add
Openbravo Client Side Components - Javascript API
When adding new instances and new classes Openbravo follows this convention:
- all global data is added to the global OB object
- all css style names start with OB
- all Smartclient class names start with OB
In this section we discuss the content of the main OB object and of utility functions available there.
UI Architecture - Blog post
This blog contains a nice image which displays the UI architecture and links the UI components to the javascript types/code.
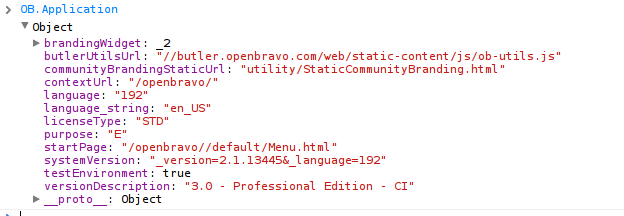
OB.Application - general application information
The OB.Application object contains data about the server side application:
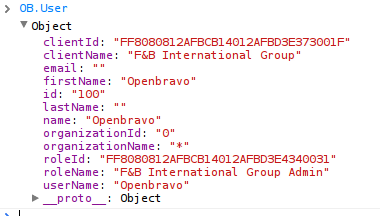
OB.User - the current user
The OB.User object contains information related to the current logged in user:
OB.Constants - common constants
The OB.Constants object contains constants which are used throughout the application. It contains constant names for parameters which are used in server requests and for delays.
OB.Datasource - getting standard and custom data sources
The OB.Datasource object provides two methods: create and get.
The get method will first check if a datasource is defined on the client for the requested if. If so it is returned directly, if not then the server is called to generate the definition of the datasource (in javascript) and return it. The returned javascript is evaluated and the created datasource is set in the target object (by calling its setDataSource method or by setting it in its dsFieldName property).
The caller of the OB.Datasource.get function should take into account that its behavior is asynchronous.
<source lang="javascript">// ** {{{ OB.Datasource.get(dataSourceId, target, dsFieldName) }}} ** // // Retrieves a datasource from the server. The return from the server is a // javascript string which is evaluated. This string creates a datasource. The // datasource // object is set in a field of the target (if the target parameter is set). This // is done asynchronously. // // The method returns the datasourceid. // // Parameters: // * {{{dataSourceId}}}: the id or name of the datasource // * {{{target}}}: the target object which needs the datasource // * {{{dsFieldName}}}: the field name to set in the target object. // * {{{doNew}}}: if set to true then a new datasource is created // If not set then setDataSource or optionDataSource are used. // OB.Datasource.get = function(/* String */dataSourceId, /* Object */ target, /* String */dsFieldName, /*Boolean*/ doNew) { ... } </source>
The create method does not call the server but creates the data source directly in the client, using the passed properties. Before creating the new data source it does a check if the data source has already been created, if so it is returned. <source lang="javascript">// ** {{{ OB.Datasource.create}}} ** // Performs a last check if the datasource was already registered before // actually creating it, prevents re-creating datasources when multiple // async requests are done for the same datasource. // Parameters: // * {{{dsProperties}}}: the properties of the datasource which needs to be // created. OB.Datasource.create = function(/* Object */dsProperties) { </source>
The OB.Datasource object creates datasources using the isc.OBRestDataSource javascript class which extends the Smartclient RestDataSource.
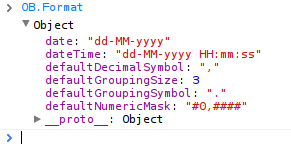
OB.Format - format patterns
The OB.Format object contains the global formatting settings of the current user regarding dates and number formatting. Note that the formatting for specific fields is controlled by the Format.xml definition and not by this object.
OB.I18N - getting labels
The OB.I18N object provides a getLabel method which can be used to get a translated label from the system. The getLabel method has 4 parameters:
- key: the key in the AD_Message table for the label
- params: null, or an array of parameters, if the label contains parameters (50. %1, etc.) then they are substituted with the values in the array
- object and property: when set then the label is set in that property of the object, or if the property is a function then it is called on the object with the label as a parameter. See also asynchronous loading below here.
The system will pre-load all records from AD_Message which are not part of the core module. This means that if you try to get a label defined in core that the getLabel function will work asynchronously:
- it will initially return the key and call the server to get the label (asynchronously)
- when the label is returned then (after parameter substitution) the label is set in the object using the property, if the property is a function then it is called as a function with the label as the parameter, if it is not a function then the label is set in the object using the property.
OB.PropertyStore - handling preferences
Openbravo has a feature to define preferences on different levels (system, client, org, role, user, window) and set and get them from the system. When a user loads the application all relevant preferences are pre-loaded in the client.
The application can make use of these preferences on the client and even set them. When a preference is set then the client will call the server to update the value in the database.
The getting and setting of preferences is implemented on the client through the OB.PropertyStore object. It has 2 methods:
- get: function(propertyName, windowId): returns the value of a property for a certain window
<source lang="javascript">dataPageSizeaux = OB.PropertyStore.get('dataPageSize',this.view.windowId);</source>
- set: function(propertyName, value, windowId, noSetInServer, setAsSystem): sets a property value, for a certain window. The caller can prevent a server side set by passing noSetInServer as true and if set on the server can control at which level that is done by setting setAsSystem to true
<source lang="javascript">OB.PropertyStore.set('OBUIAPP_GridConfiguration', result, this.windowId);</source>
The OB.PropertyStore has a listener concept, which makes it possible to register a listener which gets notified when a property value changes. This is used to update the recent view list in the Openbravo Workspace tab. To register a listener call the addListener method on the OB.PropertyStore, it has one parameter the listener which must be a function. For every property change the listener is called with these parameters:
- property identifier: concatenation of the property name and window id separated by an underscore
- previous value: the previous value of the property
- new value: the new value of the property
OB.RemoteCallManager - calling the server from the client
The RemoteCallManager is used to call ActionHandlers on the server. ActionHandlers are java classes which implement the ActionHandler interface. See the ActionHandler concept.
The OB.RemoteCallManager offers one method: 'call' which has the following parameters:
- actionName: the classname of the ActionHandler class
- data: a javascript object which is passes as the request body, serialized as json
- requestParams: a javascript object, its properties are translated into request parameters:
- callback: a function which is called when the request returns, 3 parameters are passed in when called: response, data and request:
- response: the smartclient response object
- data: contains the javascript object which is created by the server
- request: the original request object
- callerContext: is returned in request.clientContext (see the third parameter of the callback
OB.ViewManager - Opening Views
The OB.ViewManager is the central point for managing which views are open in the main Multi-Document-Interface. It is also used by the history manager to support the back button and refreshing the complete application page, while still maintaining some state.
The OB.ViewManager has one main interesting method: openView(viewName, params). This function has 2 parameters:
- viewName: the class name of the view instance to create, it must be a Smartclient class which supports the static create method.
- params: a javascript object containing parameters which are passed in when creating the view
The ViewManager will check if the viewName exists as a class on the client. If not then the server is called to retrieve the class definition, if it is present then an instance of the view is created.
If the view has a property 'showsItSelf' set to true, then the ViewManager will not open the view instance in a tab in the MDI, but instead will the call the show function on the instance. This makes it possible to open popup windows through the ViewManager.
If the instance does not have a 'showsItSelf' property (or it is false) then the view instance is opened in a tab in the MDI.
This feature is available since 3.0MP18
It allows to define some actions that can be called sequentially. There are already some defined actions out of the box in core
How to set/define an action
New actions can be defined using javascript code (so they can be defined, thanks to modularity, inside a module just with a new javascript file to set the action and a component provider to load this new file). The way to define an action is like that
<source lang="javascript">OB.Utilities.Action.set('myDefinedAction', function (paramObj) {
...
});</source>
where 'myDefinedAction' is the action name and 'paramObj' is the only function argument. This 'paramObj' will be used inside the function logic.
Example:
<source lang="javascript">OB.Utilities.Action.set('showAlert', function (paramObj) {
alert(paramObj.text);
});</source>
How to call/execute an action
There are two ways to call/execute an action:
- Using "execute" function: this way executes just one action
<source lang="javascript">OB.Utilities.Action.execute('myDefinedAction', myParamObj);</source>
where 'myDefinedAction' is the action name and 'myParamObj' is an object with the needed parameters as object members.
This "execute" function has also a third optional argument "delay", used to make a delayed call of the execution.
Example:
<source lang="javascript">OB.Utilities.Action.execute('showAlert', {'text': 'This is just an example'});</source>
- Using "executeJSON" function: this way can executes several action sequentially
<source lang="javascript">OB.Utilities.Action.executeJSON({'myDefinedAction': { myParamObj }});</source> or <source lang="javascript">OB.Utilities.Action.executeJSON([{'myDefinedActionA': { myParamObjA }}, {'myDefinedActionB': { myParamObjB }}]);</source>
where 'myDefinedAction' is the action name and 'myParamObj' is an object with the needed parameters as object members. As you can see you can call executeJSON just with an object (one action) or with an array of objects (several actions sequentially)
Example:
<source lang="javascript">OB.Utilities.Action.executeJSON({'showAlert': {'text': 'This is just an example'}});</source> or <source lang="javascript">OB.Utilities.Action.executeJSON([{'showAlert': {'text': 'This is the first alert'}}, {'showAlert': {'text': 'This is the second alert'}}]);</source>
Threads
If "executeJSON" function is called with several actions to be executed sequentially (called with an array of objects) a thread is generated for this call. To do this, there is a second argument in the "executeJSON" function: "threadId". If this "threadId" is not provided, a random one will be generated.
This "threadId" argument also will be automatically added to each parameter object of each action call, so each action has a reference of the thread that has invoked it.
There are three actions that can be done to a thread:
- cancelThread
- pauseThread
- resumeThread
Full example:
<source lang="javascript">OB.Utilities.Action.set('confirmDialog', function(paramObj) {
 var text = 'Hello ' + paramObj.name + ', do you want to continue with the thread?';
 if (!confirm(text)) {
   OB.Utilities.Action.cancelThread(paramObj.threadId);
 }
});
OB.Utilities.Action.set('promptDialog', function(paramObj) {
 var text = ;
 if (paramObj.value) {
   text += 'You have introduced: ' + paramObj.value + '\n';
 }
 text += 'Please, introduce here a 0 in order to continue'
 paramObj.value = prompt(text);
 if (paramObj.value === '0') {
   OB.Utilities.Action.resumeThread(paramObj.threadId);
 } else {
   OB.Utilities.Action.pauseThread(paramObj.threadId);
   OB.Utilities.Action.execute('promptDialog', paramObj, 100);
 }
});
OB.Utilities.Action.set('alertDialog', function(paramObj) {
 var text = 'You have finished the thread!\nBye ' + paramObj.name;
 alert(text);
});
OB.Utilities.Action.executeJSON([
 {
   'confirmDialog': {
     name: 'John Smith'
   }
 },{
   'promptDialog': {
   }
 },{
   'alertDialog': {
     name: 'John Smith'
   }
 }
]);</source>
In this example, there is a thread with three actions:
1) Confirmation dialog: It asks if you want to continue the thread, so if you accept, the thread continue, if not, the thread is cancelled (OB.Utilities.Action.cancelThread)
2) Prompt dialog: If you enter 0 the threads continue (OB.Utilities.Action.resumeThread), but if you enter any other thing, the thread is paused (OB.Utilities.Action.pauseThread) and the previous introduced value is shown. Note how the function is called recursively until one condition is met using the 'delay' param of 'execute' function (100 in this case). This is to avoid browser crash due to a constant iteration in time.
3) Alert dialog: This is the last step of the thread, it just notify it to you.
The OB.Utilities.Number object contains several methods related to number formatting and rounding which are used within the application:
- OB.Utilities.Number.roundJSNumber(num, dec): round a number to a number of decimals
- OB.Utilities.Number.OBMaskedToJS(numberStr, decSeparator, groupSeparator): convert a numeric string which follows the OB numeric pattern to a javascript number
- OB.Utilities.Number.JSToOBMasked(number, maskNumeric, decSeparator, groupSeparator, groupInterval): format a javascript number using the openbravo numeric masc (defined in format.xml), decimal separator, group separator and group interval size (normally 3)
The OB.Utilities.Date object contains several date parsing and formatting methods:
- OB.Utilities.Date.OBToJS(OBDate, dateFormat): parse an Openbravo formatted date string to a javascript date
- OB.Utilities.Date.JSToOB(SDate, dateFormat): format a javascript into a date string following the Openbravo pattern
OBGrid
The OBGrid is the main grid class, used by Openbravo. If you want to implement your own grid then it makes sense to extend the OBGrid as this will make sure that your grid follows the same styling settings as the other grids.
This HowTo contains an example of extending OBGrid. The example file can be found here.
Openbravo Window Components
An Openbravo window consists of a hierarchy of tabs, each tab has a grid and a form view. In addition each tab has a toolbar and a messagebar. This user interface is represented by an internal javascript object structure. This section explains the internal structure and the main properties and methods.
OBStandardWindow
An Openbravo Window is created on the client using an OBStandardWindow instance. For each tab in the window an instance of the OBStandardView is created. The OBStandardView instances are hierarchically structured, each OBStandardView has a set of child views. An OBStandardView has an instance of OBViewGrid to represent the grid and an instance of OBViewForm to represent the form.
The OBStandardWindow has the following important properties:
- windowId: the database id of the window
- view: the root OBStandardView
- views: a complete/flattened list of all views contained in this window
For more and other properties check the source code of the OBStandardWindow.
OBStandardView
The OBStandardView has the following components:
- a form
- a grid
- a tab set with tabs, each Smartclient tab represents an Openbravo child tab
- a message bar
- a toolbar
Each of these components is discussed in more detail below.
The OBStandardView has the following properties:
- tabId: the id of the tab represented by this view
- tabTitle: the title of the tab
- standardWindow: a link back to the standard window instance
- childTabSet: the Smartclient TabSet which contains the child views, each tab in the TabSet has a pane, the pane is an instance of the OBStandardView.
- parentView: a link back to the parent, if this view is a child
- parentTabSet: the link to the parentTabSet (parentView.childTabSet === parentTabSet)
- toolBar: the OBToolbar instance for this view
- messageBar: the OBMessageBar which is displayed when a message is displayed
- viewForm: the OBViewForm of this tab
- viewGrid: the OBViewGrid of this tab
- dataSource: the data source which provides records to the grid and the form. The datasource is an instance of the OBViewDataSource which is a subclass of the Smartclient DataSource.
- isActiveView: (a function), returns true if the view is active (has the focus and an orange bar)
OBViewGrid
The OBViewGrid is a subclass of the Smartclient ListGrid. In addition to the standard Smartclient properties, the following properties are important:
- view: reference to the OBStandardView which owns this grid
- setItemValue: function(item, value), sets the value of the item and triggers the OnChange functions
- Some Smartclient methods/properties (see the Smartclient docs for more details) which can be useful:
- getSelectedRecord: get the currently selected record
- getSelectedRecords: in case multiple records have been selected, return all the selected records
- getEditForm: when in grid edit mode, contains the current edit form for that row
- getEditRow: the row which is being edited
- setValue: function(item, value), sets the value without triggering onchange functions
OBViewForm
The OBViewForm is a subclass of the Smartclient DynamicForm. In addition to the standard Smartclient properties, the following properties are important:
- view: a reference to the OBStandardView containing this form
- grid: is set when form is used in inline grid editing
- hasChanged: is true if a field on the form has been changed by the user
- isNew: if the form is editing a new record
OBMessageBar
The message bar shows informational, error and warning messages to the user. It can be useful to use the message bar when reacting to user input. For example when implementing a client side onchange function.
The message bar is implemented using the OBMessageBar type.
The following methods can be relevant:
- setType: function(type), set the type of the message bar, controls the colour and icon. The type can be one of the following constants:
- isc.OBMessageBar.TYPE_SUCCESS
- isc.OBMessageBar.TYPE_ERROR
- isc.OBMessageBar.TYPE_WARNING
- isc.OBMessageBar.TYPE_INFO
- setText: function(title, text), sets the content of the messagebar, if the title is not set then a default title is shown.
- setLabel: function(type, title, label, params), can be used to set a parameterized label, see the OB18N section.
- setMessage: function(type, title, text), combination of the 2 methods above, in addition shows the message bar.
- hide/show: call hide or show to hide or display the messagebar
OBToolbar
Each OBStandardView has its own toolbar (OBToolbar) instance, however in the user interface only one is displayed/shown: the toolbar belonging to the active view. The other toolbars are hidden.
Normally a developer does not need to 'talk' directly to the toolbar OBToolbar. The standard approach is to add a button to toolbar, see here for more information.
