Projects:Outbound Email/User Guide
Contents
Outbound Email - User Guide
Overview
This document will explain how to use the email pop-up window. First of all take care about the configuration of the system. Remember that the business partner contact email field and the user email field should be informed. See the technical documentation for more information.
Configuration and Validation
- The configuration of the email server should be completed before start using this service. Find the email server configuration side named "poc configuration" under General Setup -> Client
- The user can configure as many configuration as you want for different clients and organizations
- The documents to be send should be completed
- If the user want to send multiple documents using the grid with different contact emails and sale representative emails, all those should be informed in the business partner configuration side
Configuring Point of contact (Poc)
- Go to "General Setup" --> "Client" --> "Client" and next click on "poc Configuration" tab.
- Create a new configuration.
- Create a poc configuration for the organization "A". select this organization in the selector
- Fill all the "Smtp server" inputs with a real email account.
Send by email one document through the edit window
If you are viewing the edit windows any document in the system (sales invoice, purchase order...) you can use the email icon in the navigation bar to send the document via email to the customer. After clicking the icon a pop-up window should appear. The customer email field and the sales representative email field will be informed with the configured email address. The user could configure some other options in this window:
- Select between different templates
- Attach another file from your system
- Store the document
- Use variables to refer some customer information
Select between different templates
If is possible the user will be able to select between the configured templates. The user should only choose the desired template using the selector. the selected template will be use to build the document that the customer will get.
Attach another file from your system
If the user wants to attach another fie from his own file system is able to do this using the browse button. The steps to attach one or more documents explained below:
- Use the browse button to open the file system browser.
- Select the desired file and click on OK button.
- The file name is shown in the email pop-up window.
- If the user do agree with include this document in the list should use the button Add document to the list.
- Selected file will appear in the pop-up list.
Store the document
Just check the checkbox in the bottom of the window and the document will be stored.
Use variables to refer some customer information
This tags will replace the information related to the customer and teh document
- @cus_ref@ The document reference of the customer
- @our_ref@ The reference of the document
- @cus_nam@ The name of the customer
- @sal_nam@ The name of the sales rep.
Screenshots

- Tags you can use in the subject and in the body to refer listed items.
- Template selector.
- Attached file list. The openbravo document (sales invoice, purchase invoice...) should be attached automatically. Other file in the list attached using the file browser (4). Notice that the user is able to add and also delete the attached documents and also can check the document to store it.
- Browse your file system to look up the file you want to add. After selecting the name of the file will appear in the input beside.
- If the user do agree with the selected item will use this button to add the file to the list.
Send by email through the grid tab
The user is able to send one to n documents using the grid tab. Just should select as much documents as wanted and click on the email icon.

Using the grid if the user selects only one document and click on the email icon the will see the same screen as above although if the user select more than one document the email window appearance will change a little. See the changes in the image below.
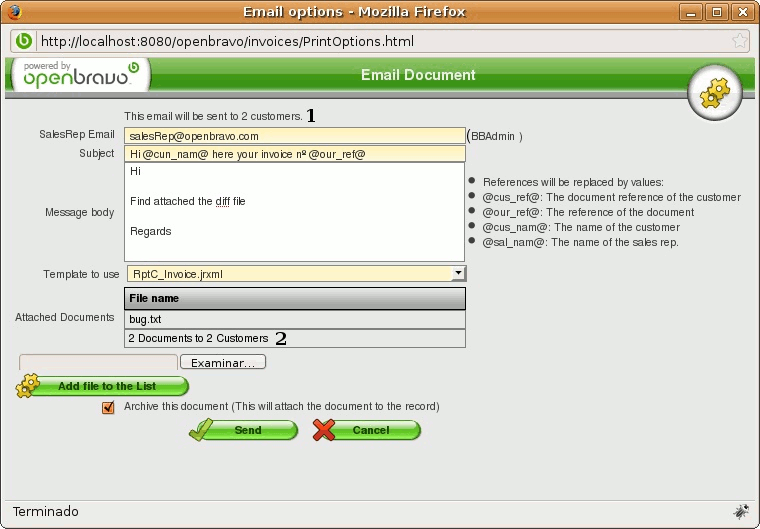

- If one more than customer will get our mail, only the amount of them will be show
- Same with the documents
Also the user could send multiple documents to multiple customer and sales representative using the grid tab. The same pop-up window will appear but the information of the customer will not appear just because could be included a lot of customer. So, for example if we have selected 10 documents to be sent to 10 customer the message below will appear.
- Document sent to 10 customers
The other functionalities described at the first point will work in the same way for the multi-selection.