Difference between revisions of "How to setup Eclipse IDE"
(Created page with "{{Languages|How_to_setup_Eclipse_IDE}} == Preparing development environment == First of all you need to install and configure different components of the Openbravo ERP envir...") |
(→Create the Tomcat Server) |
||
| (2 intermediate revisions by the same user not shown) | |||
| Line 74: | Line 74: | ||
Then open ''Servers'' view and create a new instance of Tomcat server: | Then open ''Servers'' view and create a new instance of Tomcat server: | ||
| − | [[ | + | [[File:Tomcat-server.png|center|300px]] |
While going through the wizard select <code>openbravo</code> and add it to <code>configured</code> resources. Then click "Finish". | While going through the wizard select <code>openbravo</code> and add it to <code>configured</code> resources. Then click "Finish". | ||
The created instance should appear in the view. Double click on it to change its settings in the form depicted on the picture below: | The created instance should appear in the view. Double click on it to change its settings in the form depicted on the picture below: | ||
| − | [[ | + | [[File:Tomcat.server.2.png|center|500px]] |
* Check the flag "Serve modules without publishing". | * Check the flag "Serve modules without publishing". | ||
Latest revision as of 16:43, 22 October 2018
| Languages: |
ContentsTemplateThis sub-template doesn't display properly when not included. Please see Template:Languages for the complete version. UsageThis template is designed to simplify Template:Languages, by allowing a simpler syntax for adding new languages. Each language is included by calling this template with the following parameters:
This template should not be used anywhere except in the Languages template. </noinclude> | Translate this article... |
Preparing development environment
First of all you need to install and configure different components of the Openbravo ERP environment as it's described in Custom Installation guide. In order to comply to development requirements some of those components have to be additionally adjusted according to Development Stack Setup.
| Double check that you have read and followed the Development Stack Setup article |
After completing all of the steps in the aforementioned guides, please make sure that:
- Your OS user has read/write access to your tomcat installation home directory (CATALINA_BASE).
- Environment variables (e.g. ANT_OPTS, CATALINA_OPTS, JAVA_HOME, ANT_OPTS, etc) are declared in the proper categories (i.e. System/User variables) (windows only)
- You have downloaded the latest Eclipse IDE for Java EE Developers release .
Download source code
The source code can be checked out using any Mercurial client. There is no any restrictions on the read access so you wouldn't need any credentials to access the repository. The detailed procedure of the source code check out is described in Mercurial Manual for Openbravo Developers. As it's explained in the guide it's normally considered as a good practice to have a pristine clone and working one, so we would strongly encourage you to follow that 'rule'. It is also highly advisable to clone the repository into a destination directory which is outside of Eclipse workspace.
If you want to build the latest stable release:
<currentversion type="link">
$ hg clone https://code.openbravo.com/erp/devel/main openbravo
$ cd openbravo
$ hg up #version#
</currentversion>
For Openbravo developers, you should work with the pi repository: <source lang="bash">hg clone https://code.openbravo.com/erp/devel/pi $ cd pi </source>
Openbravo installation
The Openbravo ERP installation is performed in several steps.
Configure the properties
So, first of all you have to configure the Openbravo ERP by specifying some general properties, e.g. Tomcat installation directory, database connection details, etc. This can (and in fact must) be done via a console application which has to be compile first. For that, go to the directory with the working clone of the repository and execute:
<source lang="bash">ant setup</source>
The invocation of this ant target will compile and execute automatically a console application.By going through the console application provide all requested information and at the end, select Accept to apply the changes and close the application.
Note: More about setup ant task can be found at Openbravo.properties#Edition.
As a result of these actions a new file Openbravo.properties, containing specified settings, will be created in config subdirectory.
| While going through the console application, DO NOT change the default context name which is openbravo. This guide assumes that it will be left this way. |
More about the properties can be found at Openbravo.properties. Now the Openbravo ERP is ready to be installed.
Install from sources
In order to install the Openbravo ERP three main procedures have to be accomplished:
- the Openbravo ERP database has to be created and populated with some initial values
- sources have to be generated
- all sources have to compiled to binaries which later can be executed on a WEB server (Tomcat).
All this is done by invoking from the root of the working clone (XXX\opensource\openbravo\erp\devel\main\).
ant install.source
This process can take quite long time (up to 25 min) depending on hardware configuration. It's always a good idea to redirect the output of the task execution to a log file which then can be analyzed or sent to the support team in case of problems. After the task has completed the log should not contain any error or exception massages as well as it should have BUILD SUCCESSFUL message at the end of the file. (if you are under Linux use grep command to check whether the file contains any exceptions). After successful installation the next step can be taken - importing to Eclipse IDE.
Problems running install.source
If you find problems running install.source, check the Installation/Troubleshooting article
Import into Eclipse IDE
Launch Eclipse.
Now 4 projects need to be imported in the workspace (by menu File=>Import and then General=>Existing Projects into Workspace). Here they are:
openbravo        XXX\opensource\openbravo\erp\devel\main\
OpenbravoCore    XXX\opensource\openbravo\erp\devel\main\src-core
OpenbravoTrl     XXX\opensource\openbravo\erp\devel\main\src-trl
OpenbravoWAD     XXX\opensource\openbravo\erp\devel\main\src-wad
Create the Tomcat Server
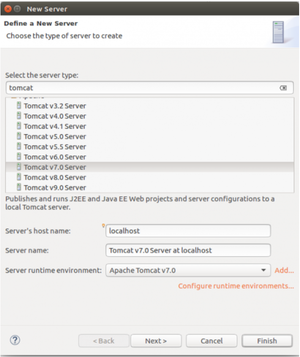
Then open Servers view and create a new instance of Tomcat server:
While going through the wizard select openbravo and add it to configured resources. Then click "Finish".
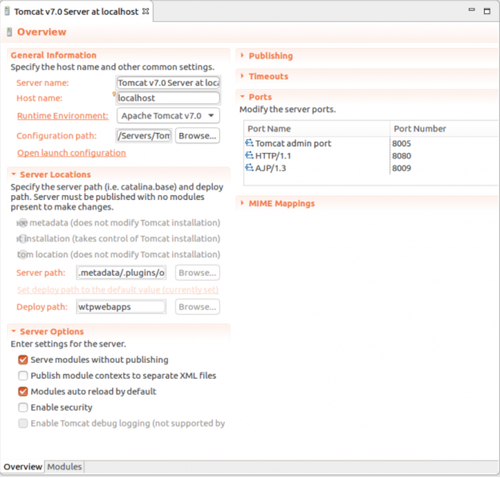
The created instance should appear in the view. Double click on it to change its settings in the form depicted on the picture below:
- Check the flag "Serve modules without publishing".
- In the modules tab edit openbravo module and uncheck the "Auto reloading enabled" flag.
Change VM arguments settings
- in General Information
- click on Open launch configuration link
- switch to Arguments tab
- add the following line at the end of VM arguments input:
-server -Djava.awt.headless=true -Xms384M -Xmx1536M -XX:MaxPermSize=256M
- in Server options
- check the Serve modules without publishing
- in Timeouts
- set Start and Stop timeouts to 120 seconds
After changing all, save your server configuration (press Ctrl+S).
Renaming server
When creating a new server, by default is is named "Tomcat v7.0 Server at localhost". This name can be changed to something custom, both at creation time or later by editing it in server window.
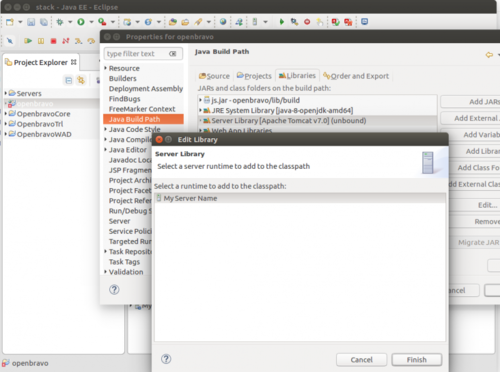
In this case, it is necessary to bind the Server Library with the actual server. To do so:
- In Project Explorer view, right click on openbravo project and select Properties.
- Select Java Build Path left menu item.
- Select Libraries tab, there you should see Server library is marked as unbound.
- Click Edit button.
- Select your server.
Import Preferences
The next step is to set the standard preferences used in the development of Openbravo.
- The preference file is located in the openbravo/config/eclipse folder in the development project
- Import workspace preferences clicking on File > Import, then select General > Preferences and click on Next button.
- Browse to openbravo/config/eclipse/openbravo-eclipse-prefs.epf file, select Import all radio button and click on Finish button.
Once finished, select all the projects, refresh them, and rebuild them (right click on one or more projects and you will find the Refresh and the Rebuild options). You should get warnings, but not errors.
| Latest Eclipse releases starting from Mars do different Java formatting than previous ones. In order to maintain the same formatting, it is necessary to install old formatter as plugin. Read here more details on how to do it. |
Launch from Eclipse
Now start the Tomcat server by right-clicking on the server instance in the Servers view and choosing Start option in the popup menu. Wait until the server is started (can take up to 2 minutes) and visit http://localhost:8080/openbravo/ in your internet browser. If everything was configured and installed properly you will get to the Openbravo ERP log in page. Use these credentials to log in:
- username - Openbravo
- password - openbravo
both are case sensitive.
That's it, the installation is over and you're ready to start developing.
| If your system has enough resources (memory/processor) then you can try enabling the Build Automatically option in the Project menu. Enabling it will give you direct feedback while developing. |
Upgrading old workspaces to >=PR17Q1
Starting from PR17Q1, the minimum System Requirements for Openbravo were increased to Java 7 and Tomcat 7. For worskpaces created in older versions, some upgrade might be required.
- JDK >=7 and Tomcat >= 7 need to be installed in the system
- Eclipse must be at least in Indigo release, though latest version is recommended
Once updated to a newer version on a recent stack, it will be automatically allowed to write Java 7 compliant code.
If Tomcat 6 was used, the server needs to be removed and a new Tomcat >=7 needs to be created, after it, a rebuild will be required, see how here.
Upgrading old workspaces to >=PR18Q4
Starting from PR18Q4, the minimum JDK required for Openbravo was increased to Java 8. For worskpaces created in older versions, some upgrade might be required.
- JDK >=8 need to be installed in the system
- Eclipse must be at least in Luna release, though latest version is recommended
Once updated to a newer version on a recent stack, it will be automatically allowed to write Java 8 compliant code.


