IDL User Manual
Contents
- 1 Introduction
- 2 Getting started
- 3 Collecting Data
- 4 Required Configuration Prior to Import
- 5 Import
- 6 Final Verification
Introduction
About this user manual
This manual explains how to prepare and format legacy data from existing sources and then import it into Openbravo ERP using the load process offered by this module. As the name of the module suggests, this process is designed for the initial load of data which means the import should be done into a fresh client since the data does not get updated but inserted only!
Version 3.0.0 is depends on Openbravo ERP 3.0 or greater.
Entities that can be imported
This module currently supports the import of the following entities:
- Products
- Price Lists
- Financial Accounts
- Business Partners
- Payments
- Assets
- Journal Entries
- Standard Cost
- On hand quantity / Stock
- Multiphase Projects
Getting started
Installing Openbravo ERP
The first step is to install Openbravo ERP. There are different ways of installing it depending on the infrastructure and the specific requirements.
The Openbravo ERP Installation guide explains all steps required to install and configure your Openbravo ERP environment.
Installing the Initial Data Load module
After Openbravo ERP is up and running, the Initial Data Load module should be installed. Log into the system using the System Administrator role and go to General Setup -> Application -> Module Management. Click the Add Modules tab and find the Initial Data Load module within the list of all modules available in the central repository.
Note: Keep in mind that the Initial Data Load module is a commercial module which means your Openbravo ERP instance must be activated before the module can be installed.
Note for Spanish speakers: If you want to use the Initial Data Load module in Spanish, find within the list of all modules available in the central repository the Initial Data Load Spanish (Spain) module and install it.
A detailed guide on how to install a new module can be found in the Install Module video.

Change to the role used to execute the import process
In order to be able to configure the necessary items and finally import the data into the new client, use the Client Admin role that will be created upon Initial Client Setup.
Collecting Data
All data to be imported must be collected from the legacy system or other sources and stored into flat text CSV format file(s). Most popular tools like Microsoft Excel or OpenOffice Spreadsheet have an option to export data into this format.
Template To Use
To make things easier for you, we have prepared a template (OB3_IDL_Import_Template.xls) in Microsoft Excel format that contains sheets for each of the entities that can be imported in the order recommended. This template is only an intermediary step that simplifies preparation of resulting CSV files that can then be imported into Openbravo ERP. Each sheet of this template must be exported into its own CSV file later.
Here are a few rules and recommendations for creating the template/CSV files:
- Columns defined by the template are fixed and should not be removed or rearranged in any way (the values can be left empty though which will be discussed later)
- Text values SHOULD be delimited with double quotes
- Numeric values MUST be formatted with a decimal point
- Date values must be formatted using the following mask: "yyyy-MM-dd"
- Date Time values must be formatted using the following mask: "yyyy-MM-dd hh:mm:ss"
- The first line of each file MUST contain the header definition of the columns required for the corresponding entity
- Column values MUST be separated by a comma
- The template contains sample data rows that can be used for testing/learning purposes but should obviously be removed before entering real data
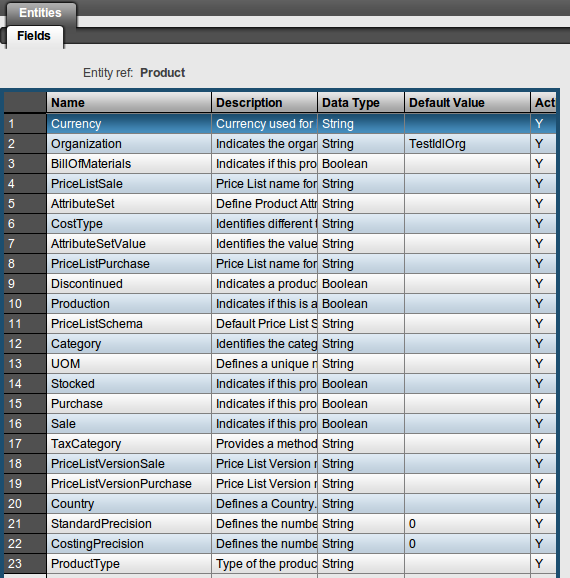
The definition of the fields/columns required for each entity are listed here:
- Products
- Price Lists
- Financial Accounts
- Business Partners
- Payments
- Assets
- Journal Entries
- Standard Cost
- On Hand Quantity / Stock
- Multiphase Projects
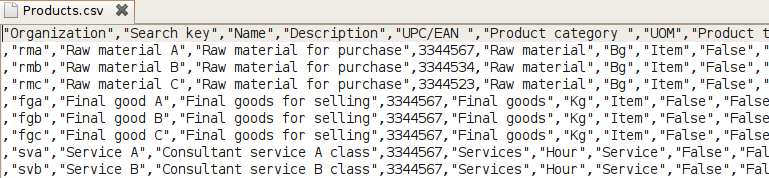
Exporting to CSV
Before the collected data can be imported into Openbravo ERP, it first needs to be exported into CSV files, one for each entity, hence:
- Products.csv
- PriceLists.csv
- FinancialAccounts.csv
- BusinessPartners.csv
- Payments.csv
- Assets.csv
- JournalEntries.csv
- StandardCost.csv
- OnHandQuantity.csv
- MultiphaseProjects.csv
Use the Microsoft Excel or OpenOffice Spreadsheet Save As functionality to save each sheet of the template given above into a separate CSV file and make sure you use the comma field delimiter and double quotes as text delimiter:

Collecting and transforming data
Legacy data stored in previous information systems can have very different formats to the required by IDL process and also can be stored in different data sources, like relational databases, indexed files like DBF, Excel spreedsheets. Data extraction from this data sources and transformation of this data to the format required by the IDL module can be very hard and take a lot of time if has to be done manually.
We suggest here to read all technical documentation of the information system where to extract the data needed by the IDL module and the data source format. Once this is done instead of extracting and transforming all these data manually an ETL tool can help with this task.
An ETL (Extract, Transform and Load) tool is specialized in extracting data from several data sources, transforming all these data to fit the operational needs, which includes the assurance of quality levels of data extracted and load to the end target, in our case generate CSV data files that comply with the requirements of the IDL process.
Most of these ETL tools have a graphical designer that helps the user to design, extract, transform and load steps easily and with a high level or productivity.
Here you have a list of ETL tools available that fit with the requirements previously exposed. And if you want to look for another tool have a look to the Tools, Open-source ETL frameworks, and Proprietary ETL frameworks sections of the ETL document.
Required Configuration Prior to Import
Generic Configurations
There are some generic as well as entity specific items that need to be configured before they can be imported. Here are some generic ones that will enable you to import the sample data given here into a fresh client. Note that the import of your custom data into your custom client is analogous (but not identical) to this process!
Creating a New Client and the Organization(s)
As mentioned previously, the Initial Data Load module should only be used to import data into a fresh and empty client/organization. Hence, create the necessary enterprise structure that will then hold the data. If you are going to import entities that require accounting or you will use the accounting functionality of Openbravo ERP be sure to create legal Organization(s) with accounting. Details on how to model the structure of the enterprise within Openbravo ERP and create the client and the organizations accordingly can be found here. When creating the client, make sure you select the Initial Data Load reference data along with other you might need to be initialized within the new client, for example:

Then, when creating the organization using the Initial organization setup process, remember the name that you give the organization since it will be very important later when importing legacy data into a specific organization. For example:

- The name of the organization in the example above is TestIdlOrg which will be the key name that will have to be used within the import CSV files for records that apply to this specific organization.
- Notice that the Organization type is Legal with accounting but accounting is not included which means it will be inherited from the client defined previously.
Create fiscal calendar periods
Before items such as bank accounts, their initial balances and open receivables and payables can be imported, the fiscal periods MUST exist.
In case of the template sample data, this is the required configuration:
- Login as Openbravo user and switch to TestIdlAdmin role
- Go to Financial management || Accounting || Setup || Fiscal calendar || Calendar
- Select the fiscal calendar that was automatically created upon Initial Client Setup, in this case TestIdlClient Calendar
- Switch to the [Year] tab and find that the current year has already been created.
- Press the button Create Periods and click OK, this will create 12 periods within this year corresponding to months
Configure the Organization
Before any organization specific items (such as bank accounts, pending receivables, etc) can be imported into the system, the Organization that they will belong to MUST exist and be properly configured and marked as ready.
In case of the template sample data, this is the required configuration:
- Login as Openbravo user and switch to TestIdlAdmin role
- Go to General Setup || Enterprise || Organization and select the organization TestIdlOrg
- Mark the flag Allow period control and select the calendar TestIdlClient Calendar fiscal calendar
- Save
- Press Set as ready button and click OK
Open the Current Fiscal Period
Before items such as bank accounts, their initial balances and open receivables and payables can be imported and posted to the general ledger, the fiscal periods MUST exist and be opened.
In case of the template sample data, this is the required configuration:
- Go to Financial management || Accounting || Transactions || Open/Close period control
- Click new and select:
- Organization: TestIdlOrg
- Calendar: TestIdlClient Calendar
- Until period No.: Dec-current year - this will open all periods for the current year
- Period action: Open period
- Save
- Press Open/Close all and click OK
Defining default values
You might have noticed a few facts/rules by now:
- columns inside the CSV files are predefined and fixed so they should not be removed or rearranged in any way
- some columns/fields are mandatory inside the database which means they cannot be empty
- some columns have repetitive values for all records (like the Organization column)
- some columns might lack data arriving from the legacy system that is mandatory in Openbravo ERP
Due to the facts listed, default values can be defined that will be used when a field of a record inside the CSV file does not contain a value (by listing an empty string ,"", or just null, e.g. ,,).
To defined these default values use the Master Data Management -> Initial Data Load -> Setup -> Entity Default Values window. Entities should already be predefined here as part of reference data that belongs to the Initial Data Load module:

For each of the entities, you will also find common mandatory field placeholders for the default values:

An Example
- Say we would like all products that are going to be imported to belong to our previously defined organization TestIdlOrg
- The default value of the Organization field should then be set to TestIdlOrg as shown below:
 Default Organization Value for Products
- The CSV file now does not need contain any value for the Organization column
 CSV with no value for the mandatory Organization field
- Upon import, the default value set for Organization field will be used for all records inside the CSV that do not have the Organization field value


Universal Default Values
There is also the possibility to define the same default value for a field across all entities. To do so, follow the steps:
- select the 'All Entities' record inside the Entity Default Values window
- switch to [Fields] tab
- define the default value selected, this default value will then be used for all entities when a record contains a null/empty value of that field
For example, to define our previously defined organization TestIdlOrg as the default organization for transactional records (records that must belong to a specific organization and cannot belong to organization 0-shared one), do as the screenshots suggests:

Import
Because of the dependencies and foreign keys, the entities should be imported and configured in the following sequence:
- Products
- Price Lists
- Financial Accounts
- Business Partners
- Payments
Find the sample CSV files ( ZIP ) that can be used for learning purposes. Keep in mind that these sample files are only the result of saving each one of the sheets inside the OB3_IDL_Import_Template.xls template as a separate CSV file explained earlier.
Sections with details on how to import each of the entities follow.
Description of the Process
Once all prerequisite configurations are complete for a specific entity and the CSV file is prepared, use the Master Data Management || Initial Data Load || Process || Import' form:

Here you will find two processes:
- Validate
- Import
In order to execute them, select the CSV file that contains the entity's import data and select the correct entity from the dropdown.
Validation
This process validates the correctness of the data contained in the CSV file, reads all rows and verifies that the data values are correct. It checks data types, mandatory fields and that references to fields in other tables are valid (such as 'Country', 'Region', 'Tax Category', etc).
If the validation is successful a message similar to this will be shown:

If the validation fails then a message like this will be shown:

Correct the CSV file according to the message shown and retry the validation until successful.
Process
Before running Process it is highly recommended that each CSV passes the validation described above.
This process tries to import all rows into their final destination inside Openbravo ERP.
In case a row is rejected the process stops and ignores the remaining rows. The steps to follow in this case is:
- edit the original CSV file
- find the row that has been rejected
- remove ALL previous rows because they have already been successfully loaded
- fix the error
- save the CSV file
- start with the load process again
If an import is successful a message similar to this one will be shown:

Interpretation of Messages
At the end of execution of the process a message is shown with the following information:
- Total of rows read - This is the total of the rows read from the CSV file. It is the sum of the rows processed + not processed + rejected.
- Number of rows validated / Number of rows processed - Depending on the process executed this is the number of rows successfully validated or processed.
- Number of rows not processed - In the 'Process' process, after a row has been rejected the process stops and the rest of rows in the CSV file are marked as not processed.
- Number of rows rejected - This is the number of rows that the process 'Validate' or 'Process' have find an error and cannot be processed.
The result of the execution of any of the two process, 'Validate' or 'Process' can be 'Success' or 'Error'. The result is 'Success' if all rows have been processed successfully and is 'Fail' if any of the rows has been rejected, because it does not pass a validation check or because it cannot be imported into the system as part of the Process process.
For rows that have been rejected a message will be displayed in the first log panel with the cause of the rejection(s). If the cause of the rejection is a Java exception, the second log panel will display the full Java stack trace that can be used to discover the cause of the error.
Products
Configuration
The following items MUST BE CONFIGURED before the products can be imported:
- Attributes and Attribute Sets used inside the Products.csv. If none are used, this is not a required step.
The following items will be CREATED AUTOMATICALLY if they have not been configured previously and referenced accordingly:
- Product categories
- Tax categories (but no rates associated)
- UOMs
- Default Purchase/Sales Price List(s) as well as its versions and the single prices for each product in the CSV file (as part of this, a Default Price List Schema will also be created with no lines)
For the sample data to work, perform the following configurations:
- Set up the attributes
- Login as TestIdlAdmin/TestIdlAdmin
- Go to Master Data Management || Product Setup || Attribute window
- Create a new attribute Color
- Using the [Atribute Value] tab add two colors, Green and Yellow
- Go to Master Data Management || Product Setup || Attribute Set window
- Create a new set named Color
- Using the [Assigned Attribute] tab add the previously created Color attribute
Additional information on how to create and configure products can be found here: Setting up products.
What has been Created
After the import of Products.csv is successfully completed, the following items will have been created:
- Products (see Master Data Management || Product window)
- Product Categories if there are ones referenced in the CSV file that had not existed before (see Master Data Management || Product Setup || Product Category window)
- Units of Measure if there are ones referenced in the CSV file that had not existed before (see Master Data Management || Product Setup || Unit of Measure window)
- Tax Categories if there are ones referenced in the CSV file that had not existed before, however without any underlying rates! (see Financial Management || Accounting || Setup || Tax Category window)
- Default Sale Price List for sales products with prices specified (see Master Data Management || Pricing || Pricelist window)
- Default Purchase Price List for purchase products with prices specified (see Master Data Management || Pricing || Pricelist window)
- an empty Default Price List Schema for that the above two price lists must reference (see Master Data Management || Pricing || Price List Schema window)
Price Lists
Configuration
The following items MUST BE CONFIGURED before price lists can be imported:
- Price List Schema - however, the Default Price List Schema can be referenced within the PriceLists.csv since this schema will have been created by the previous import of Products.
Details on how to create and configure price lists by hand are explained in the Pricing document.
What has been Created
After the import of PriceLists.csv is successfully completed, the following items will have been created:
- Price List(s) with its version and the underlying products with prices (see Master Data Management || Pricing || Price List)
Financial Accounts
Configuration
The following items MUST BE CONFIGURED before the bank accounts can be imported:
- Matching Algorithm referenced inside the FinancialAccounts.csv.
- Country Regions if they do not exist yet for the country of your choice inside FinancialAccounts.csv
The following items will be CREATED AUTOMATICALLY if they have not been configured previously and referenced accordingly:
- One Business Partner per Financial Account. Each bank Financial Account have a business partner associated in order to have transactions associated with.
More information on creating Financial Accounts can be found here: Configuring Financial Accounts.
What has been Created
After the import of FinancialAccounts.csv is successfully completed the following items will have been created:
- Financial Account(s) (see Financial Management || Receivables & Payables || Transactions || Financial Account || Account)
- Business Partner(s), one for each Financial Account.
Business Partners
Configuration
The following items MUST BE CONFIGURED before the business partners can be imported:
- Payment terms referenced as part of the Vendor or Customer terms inside BusinessPartners.csv
- Invoice schedules referenced as part of Customer terms inside BusinessPartners.csv
- Country Regions if they do not exist yet for the country of your choice inside BusinessPartners.csv
- Business Partner Tax Category(s) referenced as part of the Vendor or Customer terms
- Price Lists referenced as part of the Vendor or Customer terms inside BusinessPartners.csv
- Financial Accounts referenced as part of Customer or Vendor terms inside BusinessPartners.csv
The following items will be CREATED AUTOMATICALLY if they have not been configured previously and referenced accordingly:
- Business Partner Category(s)
- Payment Method(s) referenced as part of the Vendor or Customer terms
For the sample data to work, perform the following configurations:
- Payment terms
- Login as IDLAdmin/IDLAdmin
- Go to Master Data Management || Business Partner Setup || Payment Term
- Click New and fill: Search key = 90D; Name = 90 days; Offset Month Due = 3
- Click New and fill: Search key = 30D/5; Name = 30 days/5; Offset Month Due = 1; Check Fixed Due Date and set Maturity day 1 = 5
- Invoice schedules
- Login as IDLAdmin/IDLAdmin
- Go to Master Data Management || Business Partner Setup || Invoice Schedule
- Click New and fill: Name = Monthly the first; Invoice frequency = Monthly; Day of the month = 1; Invoice Cut-Off day = 31
More information on how to create and configure Business partners can be found here: Business partners.
What has been Created
- Business Partners and all its belonging data in located in subtabs (see Master Data Management || Business Partner window)
- Business Partner Categories (see Master Data Management || Business Partner Setup || Business Partner Category window)
- a 'User' for each Contact of any Business Partner (see General Setup || Security || User window)
- ' Payment Methods (see Financial Management || Receivables & Payables || Setup || Payment Method || Payment Method window)
- How to create more than one Location, Contact and Bank Account
- Duplicate the row.
- Modify the fields:
- Location: if ANY LOCATION FIELDS are modified a new Location will be created for the Business Partner.
- address 1st line, address 2nd line, postal, city, region, country, phone, alternative phone, fax.
- Contact: if the contact username has changed a new Contact will be created for the Business Partner.
- Bank Account: if the Account No or IBAN is selected and has changed a new Bank Account will be created for the Business Partner.
- Location: if ANY LOCATION FIELDS are modified a new Location will be created for the Business Partner.
Payments
Configuration
The following items MUST BE CONFIGURED before the pending payables can be imported:
- G/L Item referenced as part of the Payment inside Payments.csv
The following items will be CREATED AUTOMATICALLY if they have not been configured previously and referenced accordingly:
- Payment Method(s) referenced as part of the Vendor or Customer terms
For the sample data to work, perform the following configurations:
- G/L Item for Payments
- Login as IDLAdmin/IDLAdmin
- Go to Financial Management || Accounting || Setup || G/L Item window
- Create a new record
- Enter Name = Test
- Switch to [Accounting] tab
- Create a new record
- Select the appropriate accounts
- If the account combination does not exist then use the pop up window and create a new one by:
- selecting one in the Account dropdown
- selecting the organization
- pressing Save
More information on how to manage Payments can be found here: Advanced Payment Management User Documentation.
What has been Created
- One Payment Line per payment that describes it. These Payment lines will be grouped according the Document No field value.
- ' Payment Methods (see Financial Management || Receivables & Payables || Setup || Payment Method || Payment Method window)
Assets
Configuration
The following items MUST BE CONFIGURED before the assets can be imported:
- Products used inside the Asset.csv
The following items will be CREATED AUTOMATICALLY if they have not been configured previously and referenced accordingly:
- Asset Category
What has been Created
After the import of Asset.csv is successfully completed, the following items will have been created:
- Assets (see Financial Management || Assets || Assets window)
- Asset Categories if there are ones referenced in the CSV file that had not existed before (see Financial Management || Assets || Assets Group || Asset Category window)
- Asset Amortization (see Financial Management || Assets || Amortization window)
Journal Entries
Configuration
The following items MUST BE CONFIGURED before the journal entries can be imported:
- Products used inside the Journal_Entries.csv
- Business Partners used inside the Journal_Entries.csv
- Projects used inside the Journal_Entries.csv
- Campaigns used inside the Journal_Entries.csv
- Sales Regions used inside the Journal_Entries.csv
- Activities used inside the Journal_Entries.csv
- Accounting Schema used inside the Journal_Entries.csv
- Accounts used inside the Journal_Entries.csv
The following items will be CREATED AUTOMATICALLY if they have not been configured previously and referenced accordingly:
- Accounting Combination: Account + Accounting Schema
What has been Created
- one G/L Journal Batch which contains all G/L Journal Lines (CSV file rows) grouped by G/L Journal Headers. All the entries are posted to the general ledger.
Standard Cost
Configuration
The following items MUST BE CONFIGURED before the standard cost can be imported:
- Products used inside the StandardCost.csv
What has been Created
- one Cost for each product described.
- Each Cost will be created with the field Production unchecked, the field Manual checked and th field Permanent checked.
Additional information on how to create and configure products can be found here: Setting up products.
On hand quantity / Stock
Configuration
The following items MUST BE CONFIGURED before the On hand quantity can be imported:
- Products used inside the OnHandQuantity.csv
- Costs for each Product used.
The following items will be CREATED AUTOMATICALLY if they have not been configured previously and referenced accordingly:
- Warehouses
- Locators referenced as part of the Warehouse defined
What has been Created
- One Physical inventory per On Hand Quantity record that describes it and posts it to the general ledger.
- Each Physical inventory record will be created with the Organization value of the field TransactionalOrg.
- Each Warehouse and Locator record will be created with the Organization value of the field Organization.
For more information on Warehouse management see the Warehouse_Management article.
Multiphase Projects
Configuration
The following items MUST BE CONFIGURED before the Multiphase Projects can be imported:
- Business Partners used inside the MultiphaseProjects.csv
- BP Locations used inside the MultiphaseProjects.csv
- User / Contacts used inside the MultiphaseProjects.csv
- Payment Methods used inside the MultiphaseProjects.csv
- Warehouses used inside the MultiphaseProjects.csv
- Sales Representatives used inside the MultiphaseProjects.csv
- Price List used inside the MultiphaseProjects.csv
What has been Created
- One Multiphase Project per Projects record that describes it.
For more information on Multiphase Projects see the Project_and_Service_Management article.
Automatically created items
| Be careful with the search key, it is case sensitive and if a letter is wrong capitalized the application will try to create a new object. |
Final Verification
After all required entities have been successfully imported into the Openbravo ERP application, it should be ready to accept transactions and show reports based on the imported data. However, we recommend doing a few tests in order to double check the quality and consistency of the imported data.
These are some recommended checks based on the entity they are related to:
Bank Accounts
- Post the bank statements that were created as part of the initial balance set. This process only needs to be executed in case when the accounting process is not scheduled as a background job. If it is, the process will automatically post all pending transactions that need to be accounted for.
- Verify the balance of all bank accounts loaded using the Financial Management || Receivables & Payables || Reports || Bank Report
Open Receivables and Open Payables
- Post the Manual Settlements that were created as part of the creation of receivables and payables. This process only needs to be executed in case when the accounting process is not scheduled as a background job. If it is, the process will automatically post all pending transactions that need to be accounted for.
- Verify the situation of payables using the Financial Management || Receivables & Payments || Analysis Tools || Payment Report