Payment Proposal
| Back to Financial Management |
Contents
Introduction
The payment proposal is a tool that helps the user to make payments by selecting the documents related to a given payment method or scheduled to be paid before a given due date. The system proposes what should be paid based on the selection criteria provided by the user.
The steps to follow are:
- Enter the selection criteria, that could be:
- to enter a given business partner whom its invoices we want to pay
- to enter a given payment method for instance "Wire Transfer" if we want to generate at once all the wire transfer of the month
- or to enter a given date in the field "Incl.documents up to this date" if we want to pay all the invoices having a due date before that date
- etc
- Run the process "Select Expected Payments".
This process selects the scheduled payment events of the orders/invoices, that match the selection criteria entered and makes a payment proposal. - Select those documents (orders and/or invoices) of the proposal that the organizations wants to pay.
- Submit the proposal.
This action populates the Lines tab of the payment proposal window. - Run the process "Generate Payments".
This process generates the payment or payments by having into account that:- a payment can group separate orders/invoices to be paid for the same vendor into one payment
- or group separate orders/invoices to be paid regardless the vendor into one payment.
Header
The payment proposal window allows to enter a set of selection criteria that help the user to make payments massively.
The fields to note are:
- Business Partner: if a business partner is entered only the documents due to that business partner will be proposed.
- Payment Method: if a payment method is entered only the documents having that payment method assigned will be proposed, however pending invoices or orders linked to different payment methods can also be selected by clearing the implicit filters applied (by clicking in the funnel icon.).
- Paying From: it is possible to select the Financial Account which has the above payment method configured from where we need to take the money out.
- Currency: it is possible to select a currency if the payment method selected is configured to allow making payments in multiple currencies. If that is the case a field is shown which allows to enter the "Exchange Rate" between the document's currency and the financial account's currency.
- Incl. documents up to this date: This field allows to enter a date therefore the documents of the proposal will have a due date on or before the given date.
The Select Expected Payments header button displays the documents that match the selection criteria entered above.
Notice that the data shown in the grid is filtered using the previous criteria (implicit filter). In order to see pending invoices or orders of a different Payment Method for instance it is necessary to clear the filters by clicking in the funnel icon.
Besides, the "Select Expected Payments" window allows to:
- enter a "Supplier Reference" if any
- modify the "Payment" amount if the amount to pay is less than the outstanding amount
- and select the "Write-off" check-box to write-off the difference between the outstanding amount and the payment amount entered.
per each document/raw selected.
The "Submit" button finishes the process and gets that the selection is populated in the Lines tab.
Finally, the Generate Payments header button allows to take to actions:
- either to group separate payments for the same vendor into one payment,
this option allows to group pending orders/invoice of the same vendor to be paid in one payment transaction. - or group all orders/invoices into one payment,
this option allows to group pending orders/invoice to be paid in one payment transaction, regardless the vendor.
Once executed:
- A system message displays the created payment's number/s.
- The payment summary information is reflected in the Status Bar of the Payment Proposal window.
- The Payment Out Plan and the Payment Monitor information of all the documents involved is updated.
- Finally, the Payment Status changes to Awaiting Execution when an Automatic Execution Type is defined or to Payment Made if the execution is Manual. If there is an execution process defined, it can be run by clicking the Execute Payment button.
Lines
The lines tab shows the transactions (orders and/or invoices) included in the payment proposal.

The essential financial account information to be filled in the top section of the financial account window is:
- The Name and a Description of the account.
- The Currency of the account
- The account Type: There are two account types: Bank and Cash.
Depending on the type selected the required information to enter changes. There is no need to fill in the bank account information if the account type selected is "Cash".
It is possible to define additional account types by extending the List Financial Account Type. - Whether this is the Default account to be used in transactions or not. When invoices, orders and other documents including a Financial Account are created, this will be the one shown by default.
- The Business Partner associated to this bank account. For example, the Financial Institution holding the account. This information is used for accounting purpose. Location address related to the business partner is just visual information, loaded when the business partner is selected.
- The Initial Balance: In most cases the business is already up and running at the time Openbravo is implemented. This field allows to initialize the initial balance of each Financial Account by providing real balance of the cash / bank account as it was on a date of the last reconciliation. Later on this field value is used as a Starting / Beginning Balance in the first reconciliation of this Financial Account in Openbravo. This field is only editable when creating the Financial Account.
- The Current Balance: is the balance of the Financial Account as per Openbravo records. It is calculated as the sum of the Initial Balance and every Financial Account transaction. This field is placed in the Status Bar.
- The Matching Algorithm to be used during the reconciliation process.
- If no matching algorithm is selected in that field it is not possible to import and then match a bank statement file but to Reconcile the account transactions.
- If a matching algorithm such as the Standard matching algorithm is selected that allows to use the Import Statement process. This process allows to import data from a file to the Imported Bank Statements tab, and then use the Match Statement process to match the account transactions with the imported bank statement lines. This matching algorithm supports "G/L item transactions" recognition.
- There is another algorithm delivered as a module named Advanced Matching Algorithm. This module allows Imported Bank Statement lines to be matched not only with the existing financial account transactions but also with payments, invoices or orders. If no transaction document of that type is found it registers a credit payment for the Business Partners to be used later on. This matching algorithm supports the automatic creation of payments and financial account transactions (deposits and withdrawals), including the creation of "G/L item transactions".
- The Funds Transfer Enabled is used to enable/show funds transfer button process. By default, every financial account is set as enabled.
The next section Bank Account is visible only for accounts of the type Bank and are used to specify the bank account number. This section includes information such as:
- the Generic Account No - a generic account number to identify the bank account can be introduced here. This field must be mandatory set in case either the Use Generic Accoun No. or Use SWIFT + Generic Account No. is selected at the "Bank Account Format" field.
- The IBAN - The International Bank Account Number (IBAN) is an international standard for numbering bank accounts.
The IBAN consists of a two letter ISO 3166-1 country code, followed by two check digits, and up to thirty alphanumeric characters for the domestic bank account number, called the BBAN (Basic Bank Account Number). This field must be mandatory set in case the Use IBAN option is selected at the "Bank Account Format" field. The IBAN code will be automatically validated when inserting/updating the record taking into account the rules for the country bank defined. - The SWIFT Code - Corresponds to the ISO 9362 international bank code identifier. It must be mandatory set in case the Use SWIFT + Generic Account No. option is selected at the "Bank Account Format" field.
- Country - you can select a country from the list to specify if the bank account is a domestic bank account or a foreign bank account.
- Bank Account Format - List that contains all the possible values for generating the Displayed Account Number, which will be later on used by other reports or processes to get the account identifier. Possible values are:
- Use Generic Account No.
- Use IBAN
- or Use SWIFT + Generic Account No.
- Note that other options can be added by other modules that extend the supported Bank Account Format.
More information section can include information such as:
- The Type Write-off Limit field which allows to define different type of write-off limits for a financial account. .
This field is displayed when the "Write-off limit" property value is set to "Y" in the Preference window.- The only option currently available is "Amount"
- And the Write-off Limit Value for the Write-off limit in a payment. When type selected is Amount, the value holds the amount on financial account currency.
This field is displayed when the "Write-off limit" property value is set to "Y" in the Preference window.
- Let's take for instance the setup of a "Write-off Limit" amount of 1,00 $ for a given financial account.
- While registering a customer's payment in the Add Payment window the system will not allow to write off an amount above the write-off limit amount defined.
- Same applies to supplier's payments created by using the Add Payment window or the Payment Proposal feature.
The financial account window allows to perform below listed actions:
Transaction Tab
The transactions of a financial account can be of two types:
- Deposit transactions in the case of receiving whatever document type (invoice, order, G/L item or fee) payment in
- or Withdrawal transactions in the case of making a payment out of whatever document type (invoice, order, G/L item or fee)
Those two transaction types can be created in three ways:
- automatically, if the payment method used to pay a document (and assigned to a given financial account) is configured to get that:
- the supplier's payments once processed in the Payment Out window are automatically withdrawn from the financial account
- the customer's payments once processed in the Payment In window are automatically deposited in the financial account.
- or the "G/L Item Payments" once created in a G/L Journal are automatically either deposited to/withdrawn from the financial account.
- in a batch, by adding several payments as transactions through the Add Multiple Payments process window [since PR15Q3]
- or manually, by creating a new record in the transaction tab of the financial account window.

- Fields to note in transaction tab:
- Transaction Type: the Transaction Type indicates the type of transaction to be submitted. The transaction tab also allows to create a "Deposit" or a "Withdrawal" transactions based on a "G/L Item" transaction type or on a "Payment".
- Bank fee
- BP Deposit
- BP Withdrawal
- Transaction Date: the Transaction Date field defines the date of the transaction being processed.
- Accounting Date: The date this transaction is recorded for in the general ledger.
- Payment: Payment selector
- G/L Item: General ledger item selector
- Currency: Indicates the currency to be used when processing this document
- Deposit Amount: amount in the case of receiving a payment
- Withdrawal Amount: amount in the case of make a payment
- Accounting Dimensions
- Transaction Type: the Transaction Type indicates the type of transaction to be submitted. The transaction tab also allows to create a "Deposit" or a "Withdrawal" transactions based on a "G/L Item" transaction type or on a "Payment".
If it is needed to create a "Bank Fee", Select "Bank Fee" in "Transaction Type" combo, enter a transaction and accounting date and the amount either received in or paid out.
Then save and process the transaction.

To create a new G/L item transaction, select "BP Deposit" or "BP Withdrawal" in transaction type and select the "G/L Item" in the G/L item combo, enter a transaction and accounting date, select a G/L Item, enter the amount either received in or paid out and save and process the transaction. .

If the user needs to create a new payment transaction it is allow to select a created payment or create a new payment from the payment selector.
- If the payment is created, the user should choose the payment in the payment selector.

- Description and amount fields in transaction tab will be automatically filled and to complete the transaction it is necessary to save and process.

- If it is needed to create a payment deposit transaction the user should be click in '+' button' in payment selector and add payment popup will be open. "Received In" needs to be selected in the field "Document".
This window allows to:
- select already created and processed payments
- use the field "Received From" to narrow down the searching of documents to pay
- use the business partner's "Available Credit" if any, selecting the credit in credit grid
- enter the "Actual Payment" amount received
- enter a "Payment Date"
- select the "Transaction Type" to pay
- use some other filters such as the Order or Invoice "Document No." or the "Amount From/To"
- and finally to enter a "G/L Item Payment" if needed, by adding "GL Items" in a gl item grid.
Last step is to process the just created payment and get it deposited in the financial account.
- select already created and processed payments

- If it is needed to create a payment withdrawal transaction the user should be click in '+' button' in payment selector and add payment popup will be open. In add payment popup the option "Paid Out" needs to be selected in the field "Document". This window allows to:
- select already created and processed payments
- use the field "To Be Paid To" in order to narrow down the searching of documents to pay
- use the business partner's "Available Credit" if any, selecting the credit in credit grid
- enter a "Payment Date"
- select the "Transaction Type" to pay
- use some other filters such as the Order or Invoice "Document No." or the "Amount From/To"
- and finally to enter a "G/L Item Payment" if needed, by adding "GL Items" in a gl item grid.
Last step is to process the just created payment and get it deposited in the financial account.

Payment selector has applied a explicit filter (current financial account)

It is possible to add payments for alternative financial account by clicking in the funnel icon to clear the filters.

This behavior is very useful in the following scenario:
- A customer pays an invoice with a check. At that point in time the organization does not know the financial account where the money is going to be deposited in, therefore the payment in is created and processed in a given financial account.
- Later on, after 90 days (that is customer's payment terms) we decide to deposit the check in another financial account that the used to create and process the payment.
- This checkbox allows to deposit this payment in another financial account that the one used to create and process the payment.
Add Multiple Payments
"Add Multiple Payments" process button available since PR15Q3, allows to create & process financial account transactions by selecting several payments at the same time.
The payments shown for selection are the ones having a payment status equal to "Payment Made" or "Payment Received", therefore payments having an "Awaiting Execution" payment status for instance will not be shown for selection.
By default the payments shown are the ones originally defined for this financial account. However the user can remove this filter to show & select payments from other financial accounts.

Only actions to take are entering a "Transaction Date" and selecting as much payments as required at once.
Payments selected are then listed as either:
- "BP Deposit" transactions, in the case of "Payments Received"
- or "BP Withdrawal" transactions, in the case of "Payments Made"
in the "Transaction" tab of the Financial Account.
All those new transactions are created as already "processed", therefore can either be "reactivated" if required or finally "post" to the ledger if applicable.
Reconcile
The header process button "Reconcile" is shown for those financial accounts which do not have a matching algorithm assigned.
That button opens the "Reconciliation" window.
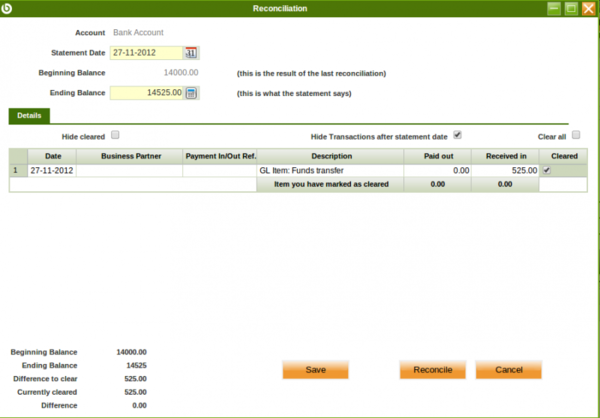
The reconciliation window has three main parts:
- the top section which includes overall information such as the financial account being reconciled, the date of the statement to reconcile, the beginning balance (or financial account "Initial Balance") and the ending balance as a result of the reconciliation. The ending balance is the last reconciliation balance of the financial account.
- the middle section which includes a list of the transactions pending to be reconciled, therefore marked as "Cleared" "No" in the financial account, transaction tab.
- and the bottom section which includes overall balance information as well as three process buttons "Save", "Reconcile" and "Cancel".
The "Beginning Balance" + the amounts "Received In" - the amounts "Paid Out" need to be equal to the "Ending Balance".
You can either enter the ending balance or what the statement says and then select the transactions paid out/received in or the other way around.
Let's take intentionally a very simple example:
- a financial account which has an "Initial Balance" of 14.000,00 USD and only one G/L item transaction for a "Received In" amount of 525,00 USD
- an statement containing only one transactions which is the G/L item transaction for a "Received In" amount of 525,00 USD
- as shown in the image below the ending balance or financial account current balance after the reconciliation is 14.525,00 USD.

Note that it is possible to create a "G/L item" transaction in case there are some minor differences between what the statements says and the recorded transactions pending to be reconciled.
The "Save" process button saves a "Draft" of the reconciliation in the Reconciliations tab of the financial account and marks the transaction/s selected as "Cleared" as also "Cleared" in the financial account, transaction tab.
It is always possible to re-open a saved reconciliation and modify whatever it is needed.
Note that there can only be one reconciliation in draft status in a financial account.
The "Reconcile" process button reconciles the transactions marked as cleared, therefore the reconciliation is processed and its status changes to "Completed".
Finally the "Cancel" process button just closes the reconciliation window and removes the ending balanced entered if any.
Import Statement
The header process button "Import Statement" is shown for those financial accounts which do have a matching algorithm assigned. This process button allows to import a bank statement which therefore is saved in the Imported Bank Statements tab of the financial account, and in the Bank Statement Lines sub-tab.
Openbravo currently delivers the "Standard" matching algorithm. The behavior of the standard matching algorithm is explained in the next section "Match Statement".
Openbravo allows to import a bank statement if an Import Bank File Format module has been previously installed.
Openbravo currently delivers below listed import bank file modules:
- OFX Bank Statement Format
- CSV Generic Bank Statement Importer
- WePay CSV Importer
- and the Spanish one Cuaderno 43
Depending on the module installed for this purpose, it will be possible to import bank statement files in OFX format or CSV format among others.
The "Import Statement" process button opens the "Import Bank File" window.

This window allows to:
- select a bank statement file
- and select the file format of the selected bank statement file to import.
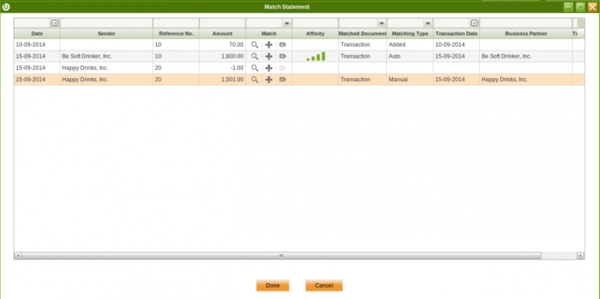
Match Statement
Once a bank statement file has been imported The button "Match Statement" opens a new window where the imported bank statement lines and the existing financial transactions are displayed. By default there is an implicit filter which hides the bank statement lines that are already matched.

Before opening the Window, a pop up will be shown, asking whether the algorithm should run against unmatched bank statement lines or not. If so, the algorithm will try to find a match for all the unmatched bank statement lines. If not, the matching Window will open and the user should do the matches manually.

This window has two column groups divided by the Match column.
- Imported Bank Statement Lines at the left side. This section list the bank statement deposits and the payments
- Date: that is the date of the movement made in the bank account.
- Business Partner: that is the business partner reported into the bank statement line
- Reference No.: that is the reference of the bank statement if any.
- Amount: that is the amount reported into the bank statement line, subtracting the Amount OUT from the Amount IN
- Transaction in Openbravo at the right side. This section list the financial account transactions which match the bank statement lines:
- Match: it provides 3 buttons to operate with the bank statement lines (explained later on). Besides, the column can be used to filter by the matching status (Yes to show cleared lines, No to show not cleared lines).
- Affinity: when the matching is automatically done by the Matching Algorithm, this field shows the affinity level of the match. If the user manually associate a transaction, this field is empty. The affinity is higher when the matching criteria is the same in both, the financial account transaction and the bank statement line.
- Matching Type: the type of matching
- Transaction Date: that is the date when the transaction was created in the financial account.
- Transaction Business Partner: that is the business partner of the transaction.
- Transaction Amount: that is the amount of the transaction, subtraction the Withdrawal Amount from the Deposit Amount
As already mentioned the matching algorithm available is the "Standard matching algorithm".
The Standard matching algorithm can be configured to match by different set of criteria:
- Match BP Name: This option makes the matching strong if the business partner name of the bank statement line and the business partner of the transaction matches.
- Match Transaction Date: This option makes the matching strong if the transaction date of the bank statement line and date of the transaction matches.
- Match Reference: This option makes the matching strong if the reference of the bank statement line and the reference of the transaction matches.
Above criteria can all be selected or just some of them.
Not matched transactions can be matched manually. Let's take for instance below shown starting situation where there are two bank statement lines do not match and one match with a weak match:

- the "magnifying glass" icon helps to search transaction to match as it opens a new window which shows the financial account transactions registered the same day as the bank statement line or before. Since Openbravo 3.0PR16Q4 several transactions can be selected at the same time to match to a single bank statement line. In that case the system will automatically split the original bank statement line as many times as transactions are selected.
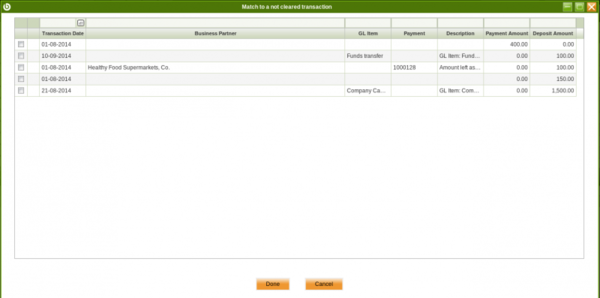 .
.- Back to our example, there is no transaction which matches the second transaction of the bank statement file (the one with an amount equal to 1.500,00) but the first one (the one with an amount equal to -2.500,00, that is a withdrawal). That one could be selected as an strong match from the fist bank statement line by using as well the "magnifying glass" icon.

- the "+" icon helps to add transactions to the financial account (and even create a payment to deposit or withdrawn from the financial account) as it opens the "Add Transaction" window.
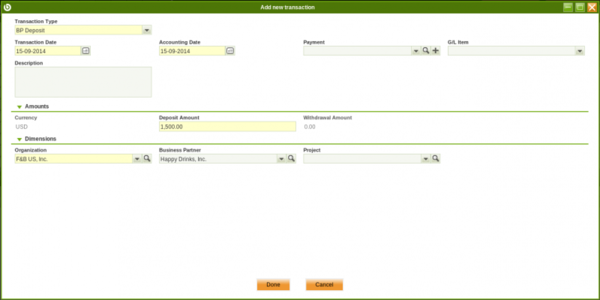
- The image above shows that there was a "Received In" transaction pending to be created in the financial account. Once created it is matched.

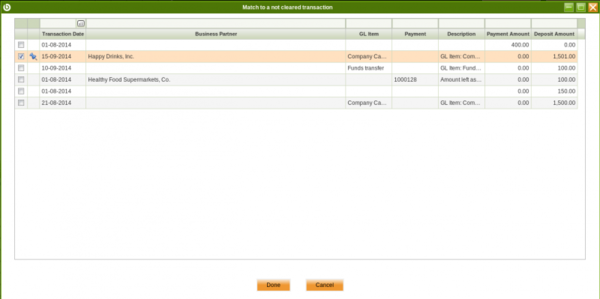
- Back to our example the current situation is shown in the image below:

- There is only one transaction pending to be matched. The "magnifying glass" icon helps again to search for transactions to match. This time there is one transaction which almost matches as its amount is 2.500,00

- If that one is selected Openbravo shows a message which informs that the transactions do not fully match therefore a partial match can be performed. Since Openbravo 3.0PR14Q4, the user can set the 'Match Statement: hide partial match confirmation popup' to Y for the Financial Account window to hide this confirmation message in the future (it will require to log out and log in)
- This action matches the bank statement line and creates a new line pending to be matched for the difference.


- the
 "unmatch" icon unmatches the transaction linked to the individual record. Starting from 3.0PR16Q1, the user has also the possibility to select multiple records and unmatch all of them in a batch using the Unmatch Selected button.
Starting from version PR14Q2, there is a new process to be able to force both reactivating and processing reconciliations. Just in case some mistake was made, user can force system to permit reactivating old reconciliations to be able to correct that data.
This should not be the standard procedure as there should be an exercise of reviewing data before validating/processing a reconciliation. In any case, errors happens and to be able to solve the situation without a big impact for the user there are now these two buttons as advanced features.
This process will impact starting and ending balance of subsequent documents whenever ending balance changes for the reconciliation being edited.
Funds transfer
New feature available in 16Q4.
Input fields:
- Transaction date:
- It is mandatory
- This date is used for the records that this process creates. Transaction and accounting date
- Deposit to: This combo box is displayed with all the financial accounts that belong to the org tree of the financial account that is selected and that have the Funds Transfer flag enabled
- G/L item: Default value is set from Default G/L Item for Funds Transfer configured in Financial Account's organization or its parent organization. The user can overwrite this parameter. This combo box is displayed with all the G/L Items that belong to the org tree of the financial account that is selected.
- Deposit amount: Mandatory
- Currency from: Not editable. Currency of the financial account selected
- Currency to: Not editable. Currency of the financial account to
- Rate: The conversion rate from one currency to other
- It is null by default
- It is shown just when currencies are different
- In case the user leaves this value as null the system will use the conversion rate configured in the system for that date. If there is nothing defined then an error will be raised
- Bank fee:
- Not marked by default
- When being checked two more fields will be shown
- Bank fee from and Bank free to
- Description:
- Description is set as "Funds Transfer Transaction" by default. The user can overwrite the description if needed.

Process
Being in the account tab and selecting the corresponding financial account:
- It creates a new record in the transaction tab for that financial account:
- Transaction type: BP Withdrawal
- Transaction date: The one selected in the popup
- Accounting date: The one selected in the popup
- G/L items: The one selected in the button
- Description: G/L Item: the one selected in the popup
- Currency: The one of the financial account
- Withdrawal Amount: The amount entered in the button
- Processed: Y
- Organization: the same as the financial account
- Status: Withdrawn not cleared
- If Bank fee from is filled, it will create another record in the transaction tab for that financial account:
- Transaction type: Bank fee
- Transaction date: the one selected in the popup
- Accounting date: the one selected in the popup
- Currency: The one of the financial account
- Withdrawal Amount: The amount entered (Bank fee from)
- Processed: Y
- Organization: the same as the financial account
- Status: Withdrawn not cleared
- It creates a new record in the transaction tab for the deposit to financial account
- Transaction type: BP Deposit To
- Transaction date: The one selected in the button
- Accounting date: The one selected in the button
- G/L Items: The one selected in the button
- Description: G/L Item: the one selected in the button
- Currency: the one of the financial account
- Deposit Amount: The amount entered in the button
- Processed: Y
- Organization: The same as the financial account
- Status:Deposit not cleared
- Origin financial account: Point to the transaction created for the Financial Account selected to open the button
- If Bank fee to is filled, it will create another record in the transaction tab for that financial account
- Transaction type: Bank fee
- Transaction date: The one selected
- Accounting date: The one selected
- Currency: The one of the financial account
- Withdrawal amount: Bank fee to
- Processed:Y
- Organization: the same as the financial account
- Status: Withdrawn not cleared
- Origin financial account: It will point to the financial transaction that triggered the transaction
Full list of Payment Proposal window fields and their descriptions is available in the Payment Proposal Screen Reference.
| Back to Financial Management |